Chapter 1 -Creating and Exporting Your Metaperson Avatar
?? Learning Goal
In this chapter, you'll learn how to navigate to the AvatarSDK website, choose your avatar, and export a version that's better suited for VRChat-especially for Quest users.
?? Step-by-Step
Instructions
1. Open the AvatarSDK Website
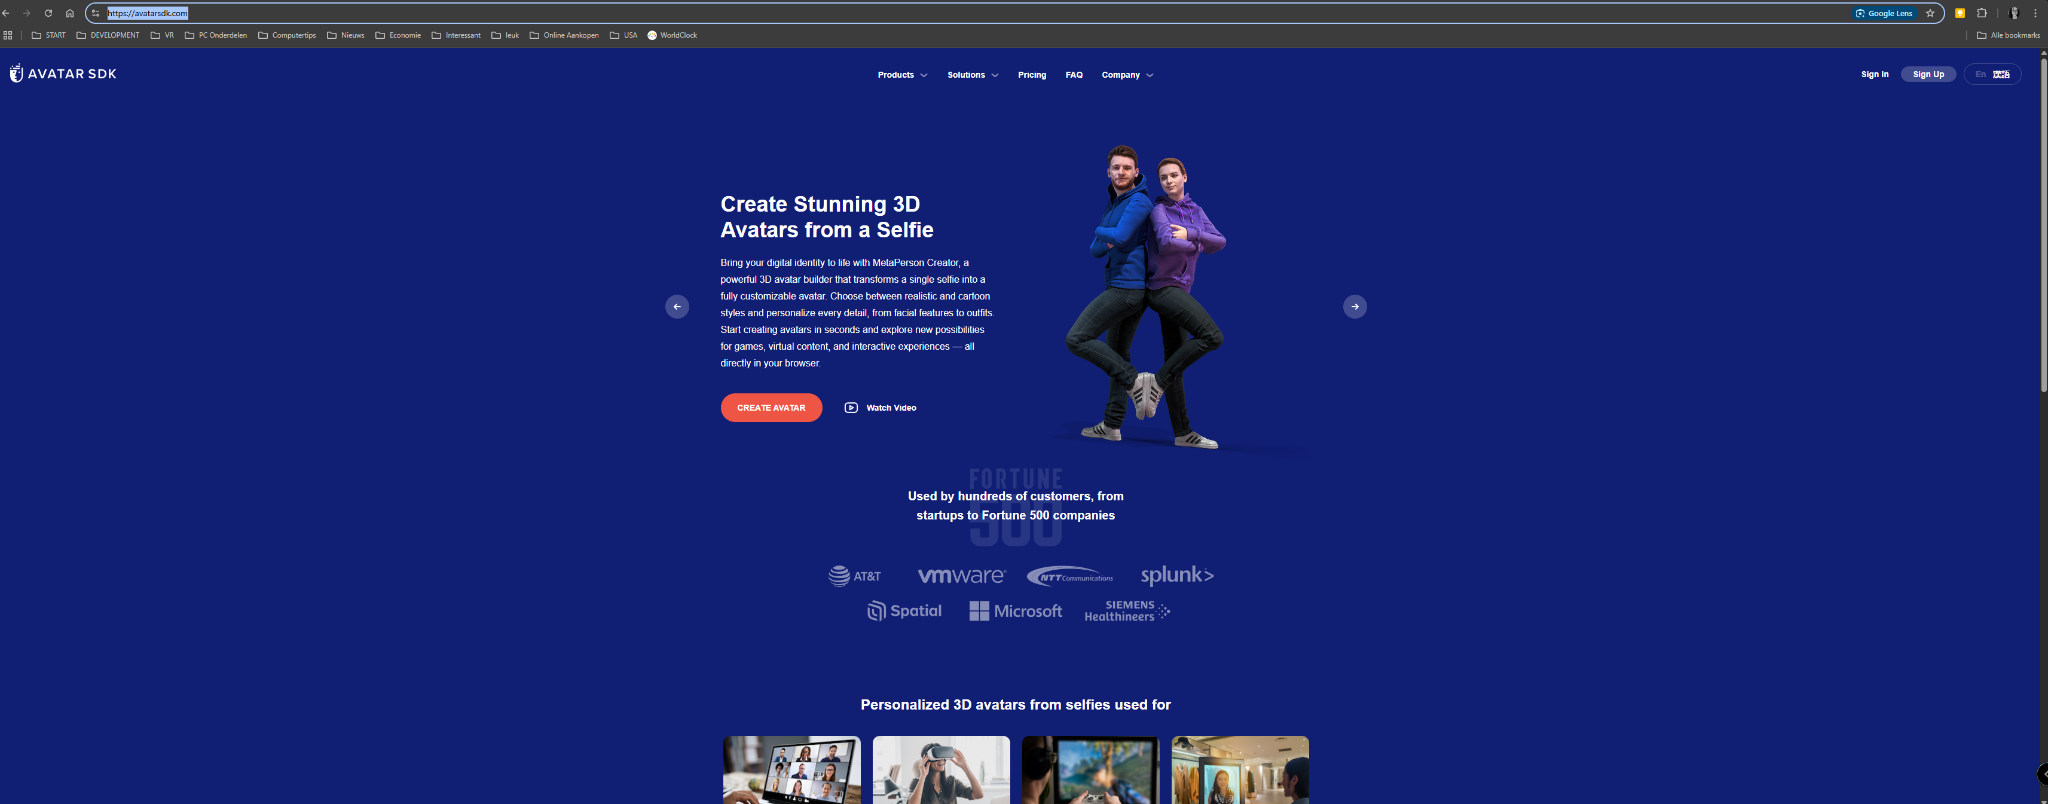
Start by going to https://avatarsdk.com.
As shown below, click the Create Avatar button in the center of the
screen to get started.
2. Choose Your Starting Point
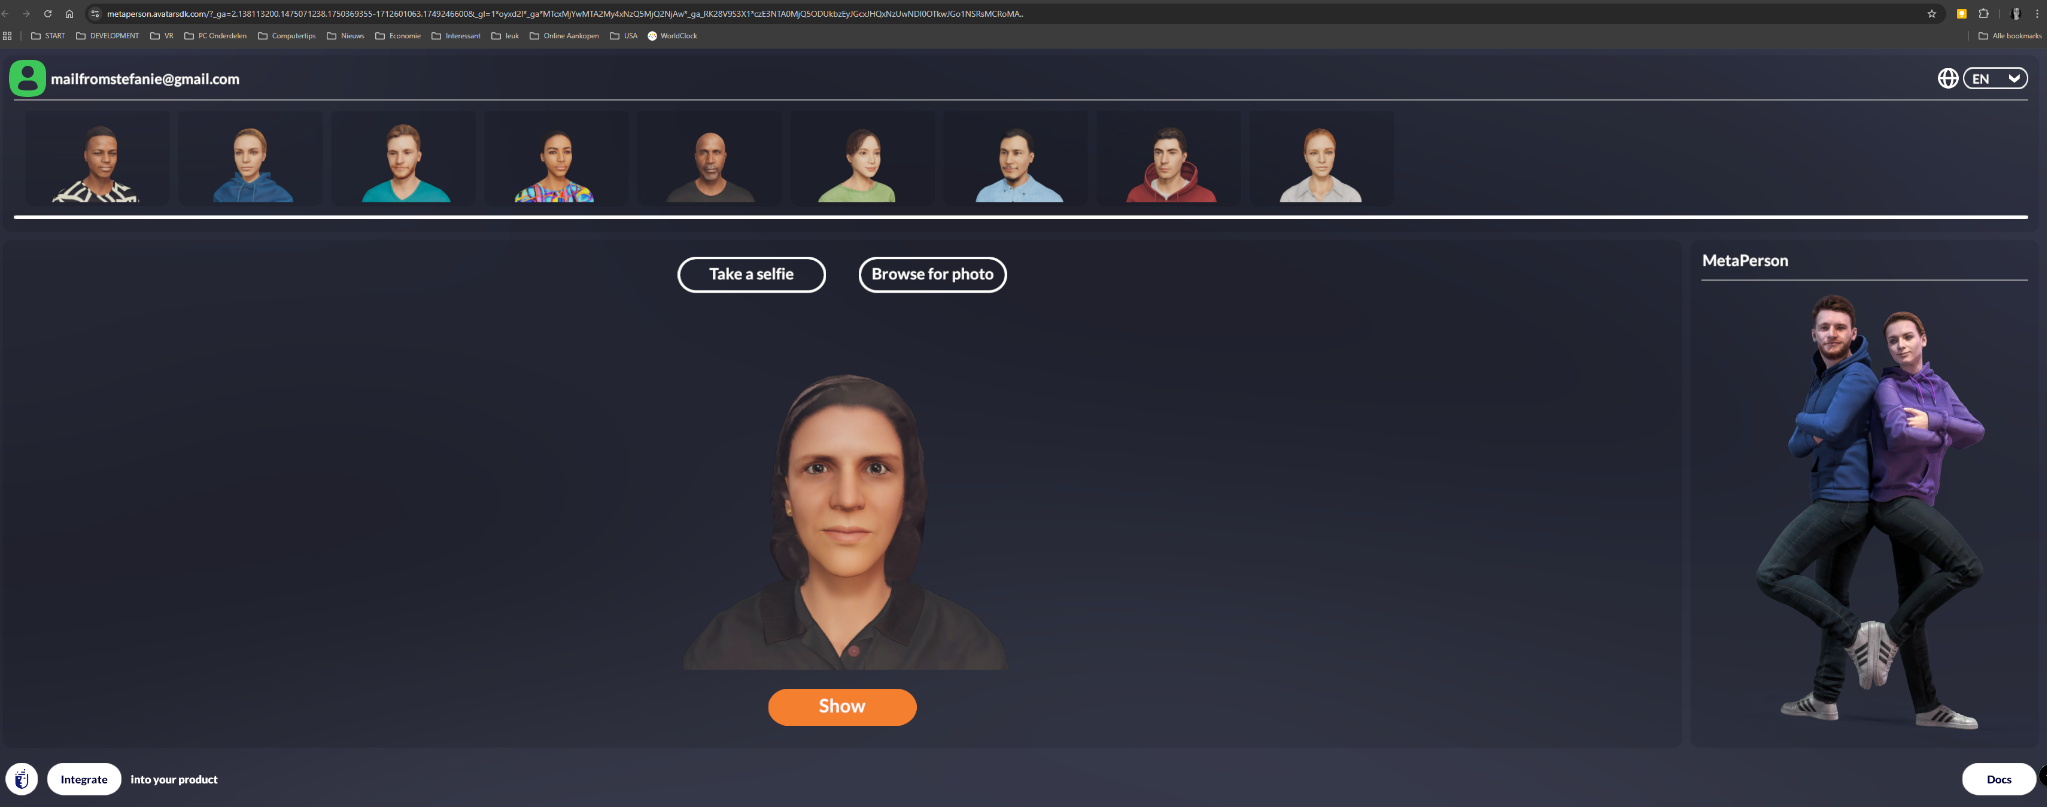
You’ll now arrive at the avatar selection screen. If this is your first visit, the site may walk you through some setup steps first (not shown here).
Here, you can:
- Take a selfie
- Browse for photo
- Or
click Show to open a previously created avatar
Click Show to continue with an avatar you've already created.
3. Customize Your Avatar
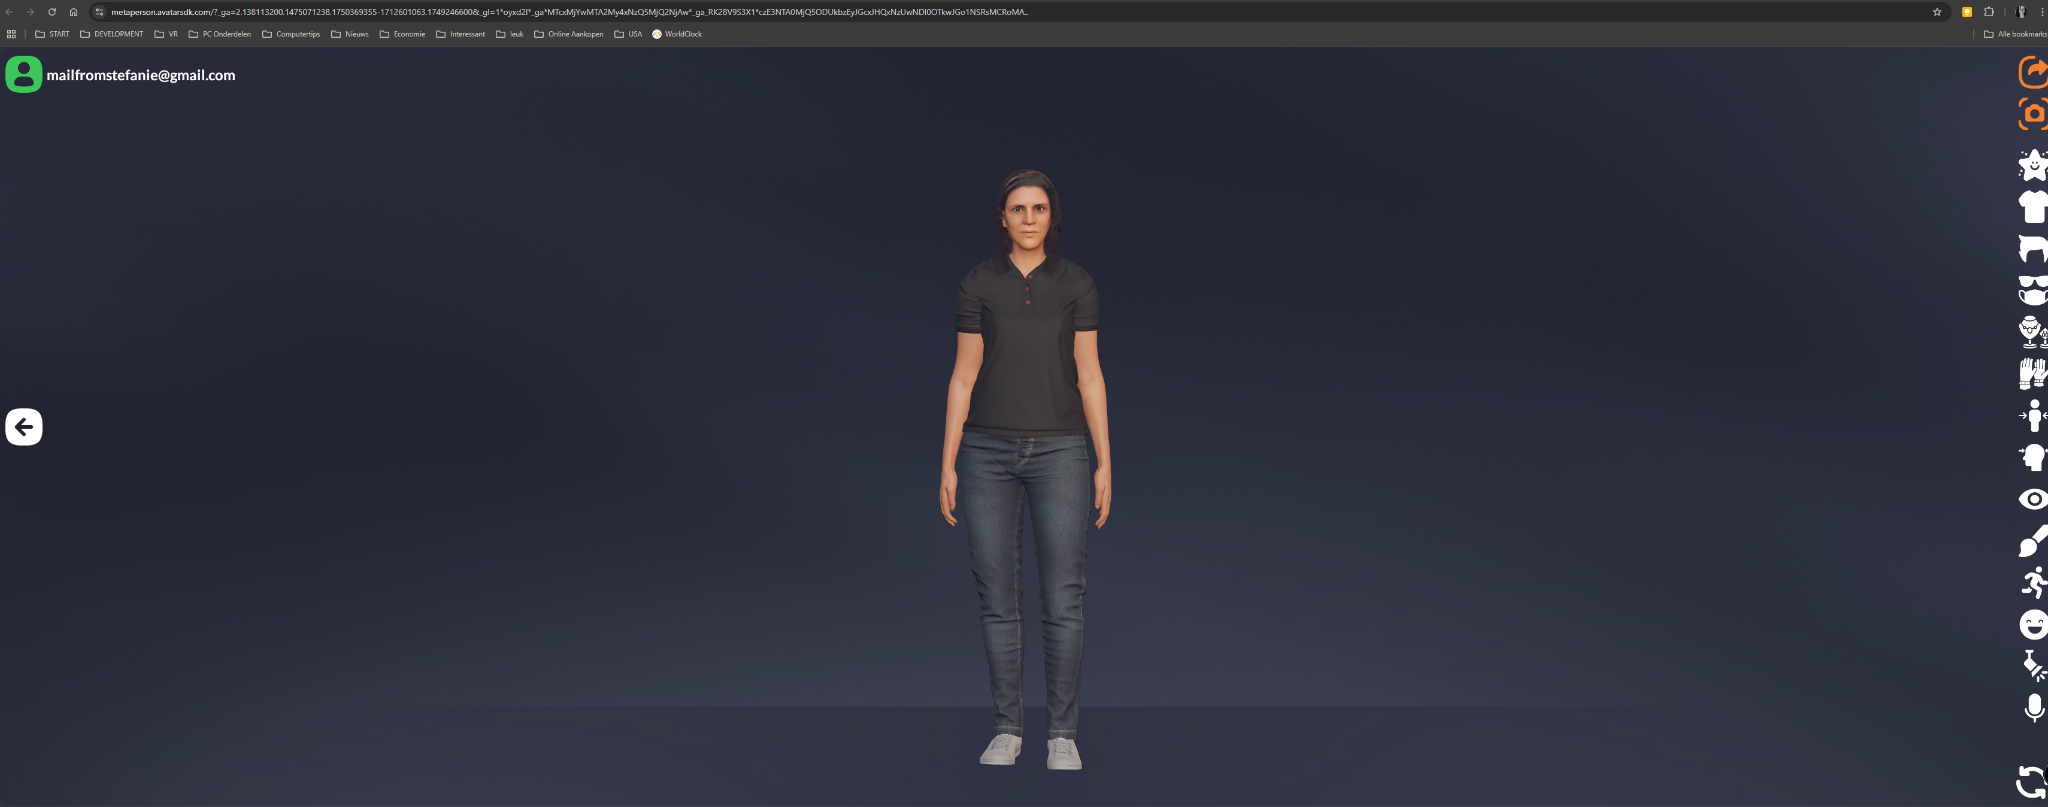
Once loaded, you'll see your avatar in a full-body preview. On the right, you'll find customization options such as:
- Hairstyle
- Clothing
- Accessories
- Body shape and more
Take your time here. A well-prepared avatar is easier to
optimize later.
Use the vertical toolbar on the right to adjust your avatar to your liking.
4. Start the Export Process
When you're happy with the result, click the orange Export
button on the right.
Click this button to begin the export.

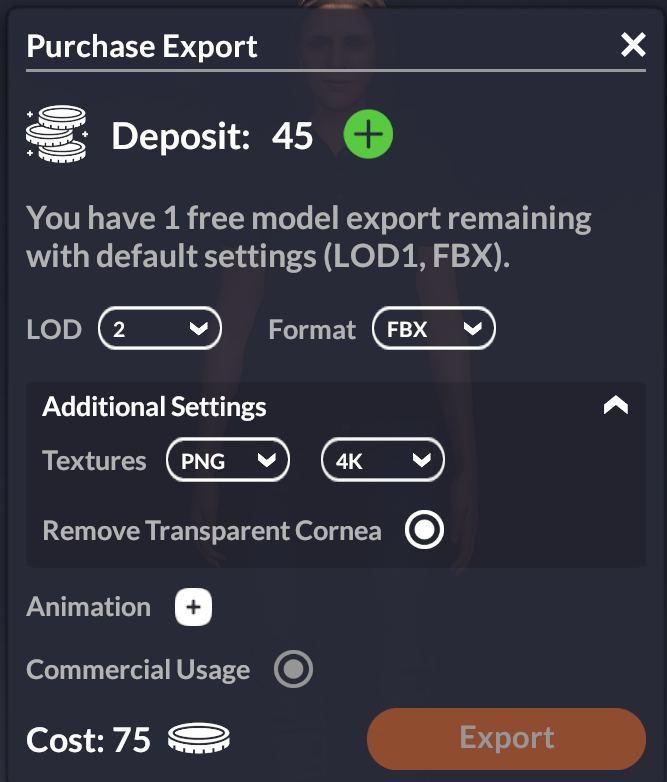
5. Choose Export Settings -Basic (Free)
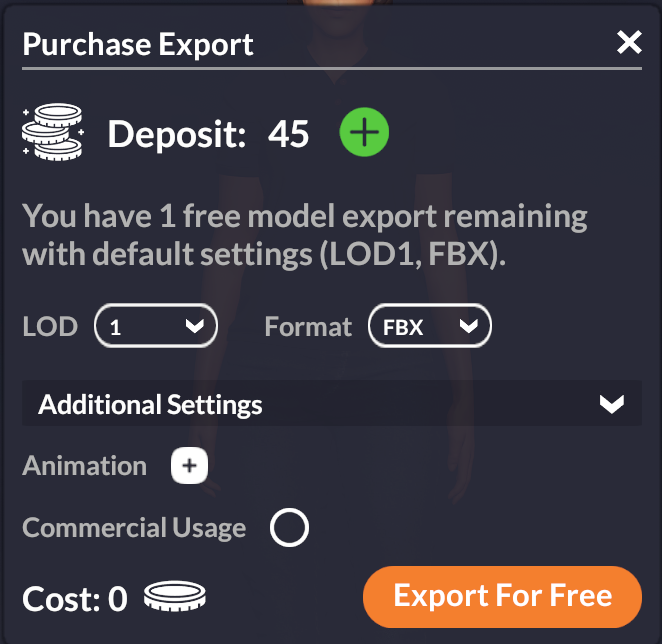
You now have the option to export your avatar. If this is
your first time, you’ll likely have one free export available.
The default export gives you:
- LOD 1 (around 70,000 triangles - high poly)
- Low-resolution textures
This is not ideal for VRChat on Quest and can be
heavy for PC avatars as well.
Here’s what the default free export looks like:
6. Recommended Export Settings for VRChat
Instead, consider using the following custom settings:
- LOD 2 (about 20,000 triangles - more Quest-friendly)
- FBX format
- PNG
textures in 4K
This gives you higher-quality textures and a more optimized base to work with later.
These settings are ideal for VRChat optimization and allow for easier texture editing later.
7. Download and Organize Your Avatar
After clicking Export, the avatar will be processed. A .zip file will appear in your Downloads folder.
Now it's time to get organized. Create a dedicated folder on
your computer-for example:
??
C:\MyAvatars\Metaperson01
Unzip the downloaded file into this folder.
But don’t stop there:
??
Also place all related files here-such as your exported FBX, textures,
Unity project version, plugins, and even Blender tools used in this process.
This way, if you ever want to create another avatar later
on, you’ll already have everything prepared and compatible:
-The right software versions
-The correct plugins
-And a clear reference of what you used
? Final Tips
- Even if you're just experimenting, choose export settings
that match your final platform (like Quest). It will save you time and
performance issues later!
- Add a small README file in that folder describing which version of Unity,
Blender, and plugins you used. Your future self will thank you!
Chapter 2 -Downloading the Correct Blender Version
?? Learning Goal
In this chapter, you'll download and install the exact Blender version required for this tutorial (version 3.4.1). This ensures that all plugins, including the CATS plugin, work flawlessly without crashes or compatibility issues.
??? Step-by-Step
Instructions
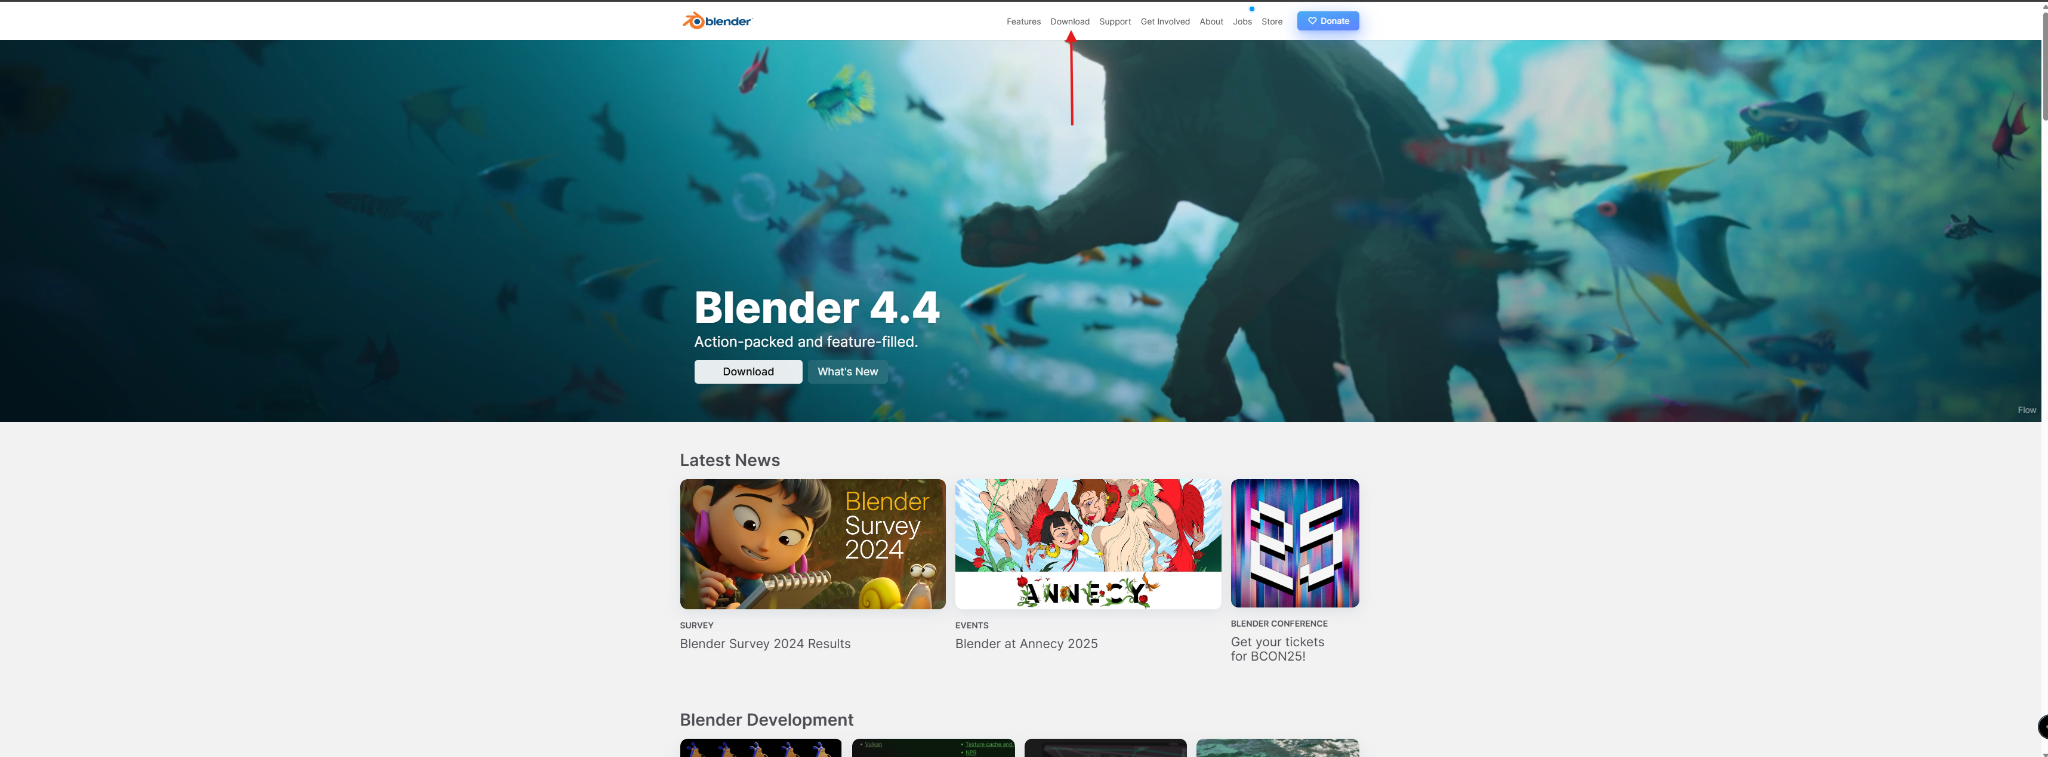
1. Go to the Blender Website
Start by going to https://blender.org.
As shown below, click on the Download button in the top navigation bar.
2. Access Previous Versions
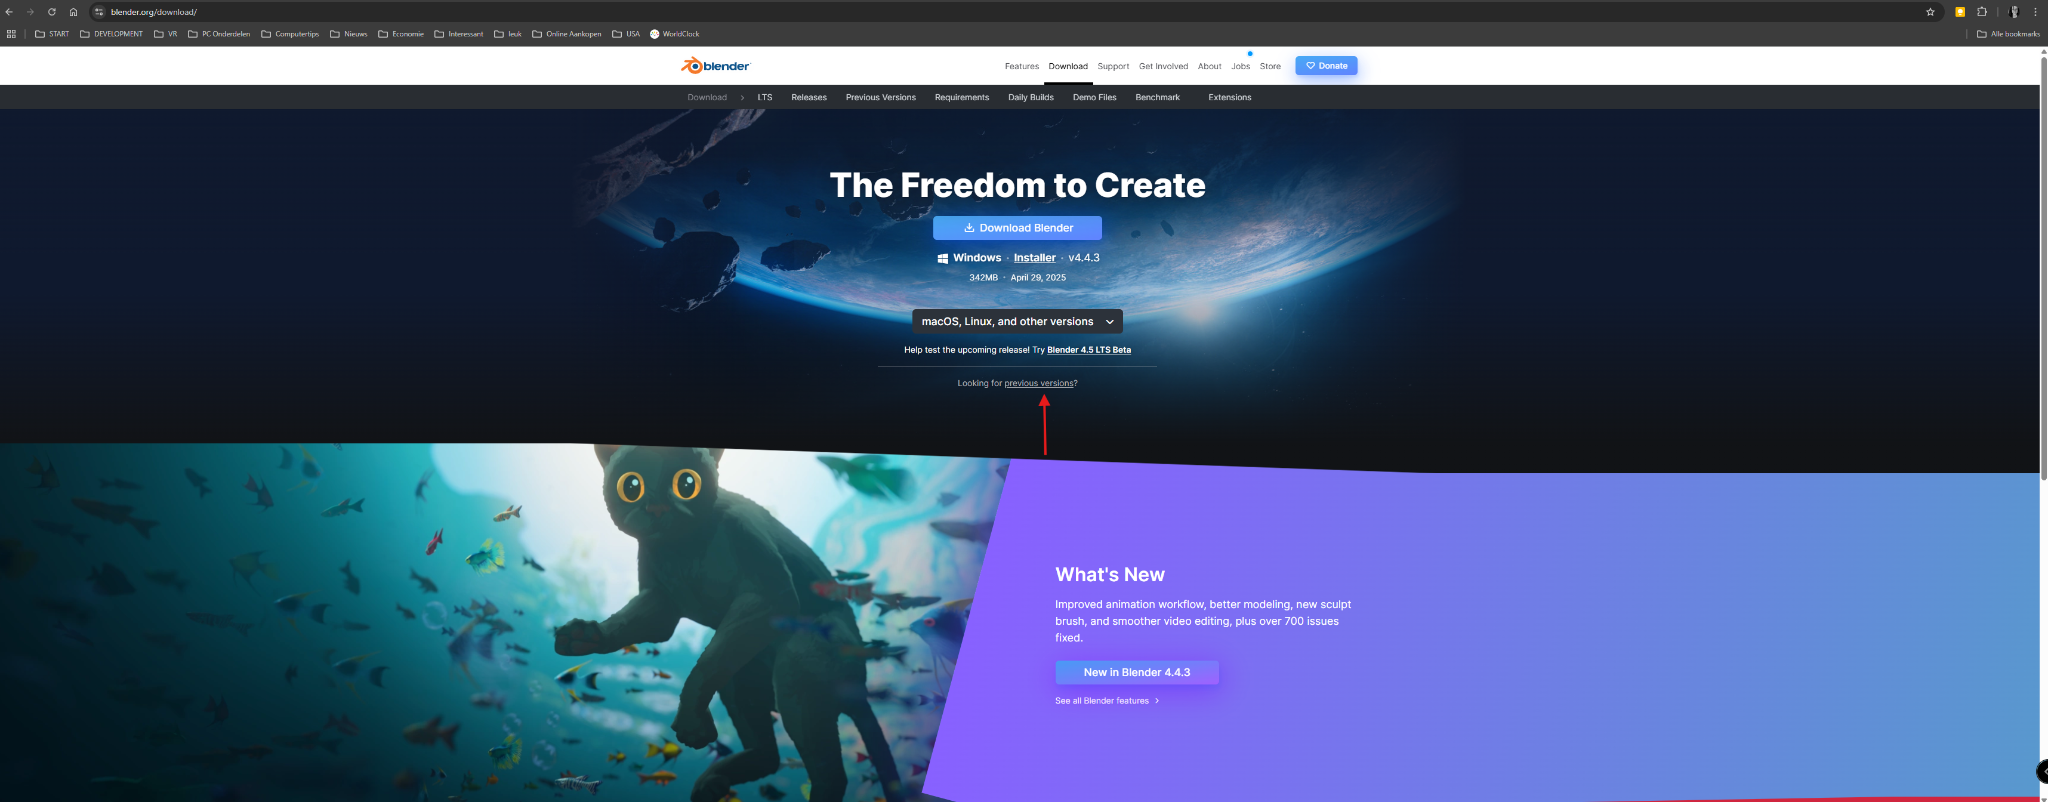
On the downloads page, scroll down and click on the link
that says “previous versions”.
Click the highlighted link to continue.
3. Choose Any Blender Version
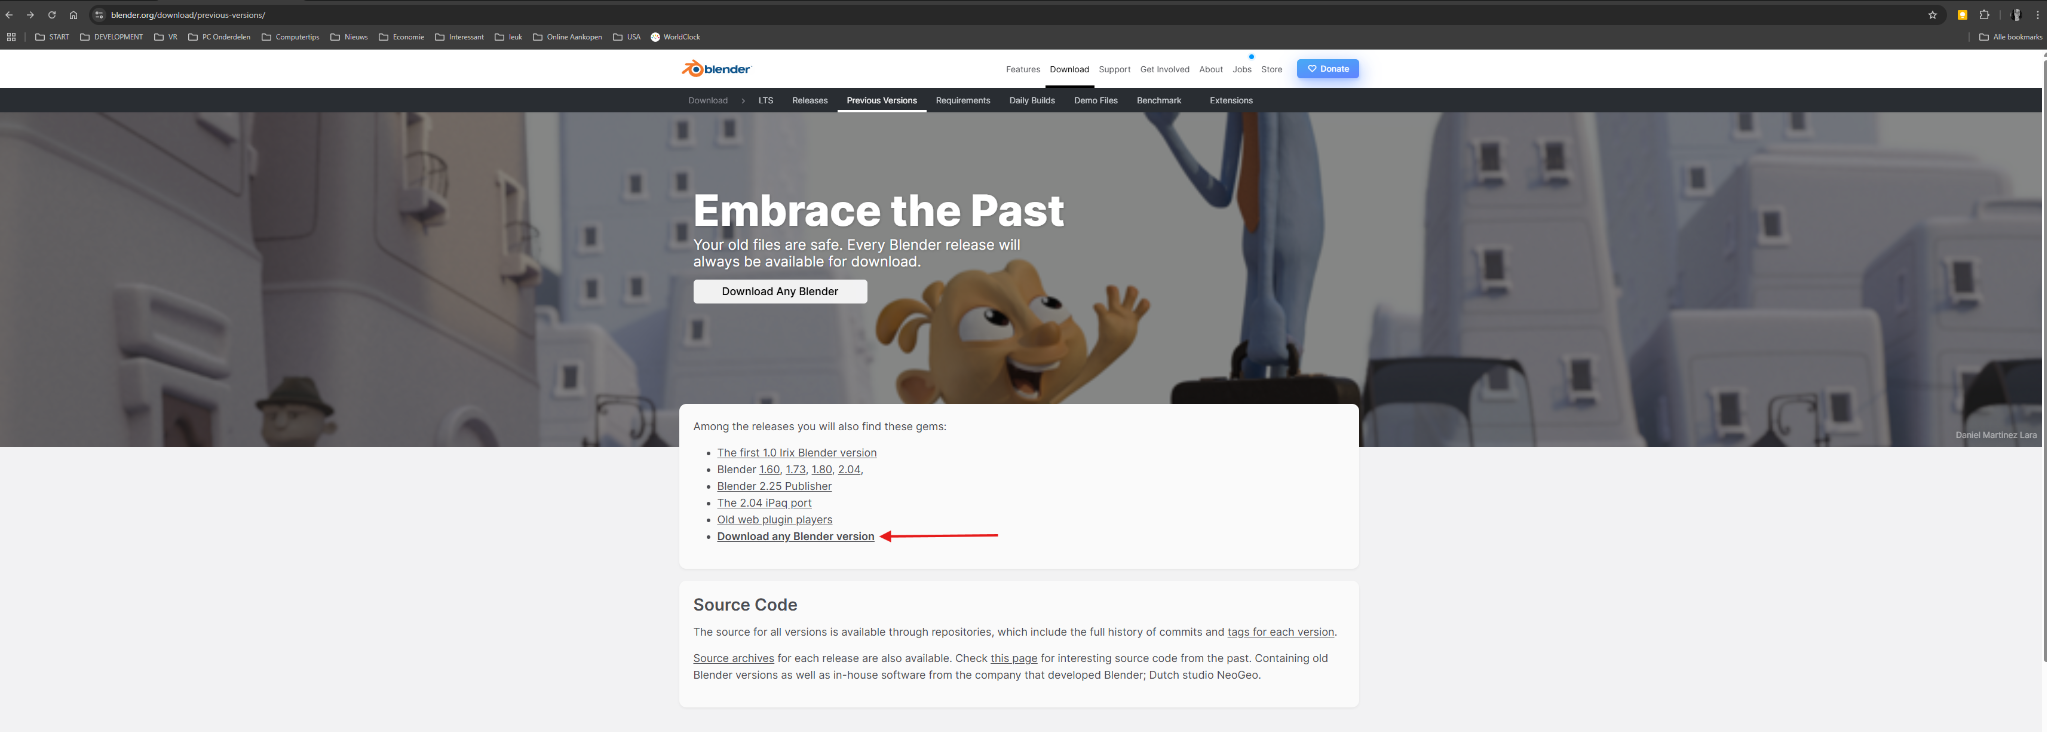
You’ll now land on a page titled “Embrace the Past”,
where you can download any past Blender version.
Click on the link that says Download any Blender version.
4. Select Blender 3.4
On the next page, scroll through the list and locate Blender3.4/.
This version is essential for compatibility with the CATS plugin we’ll use
later.
Click on Blender3.4/ to continue.

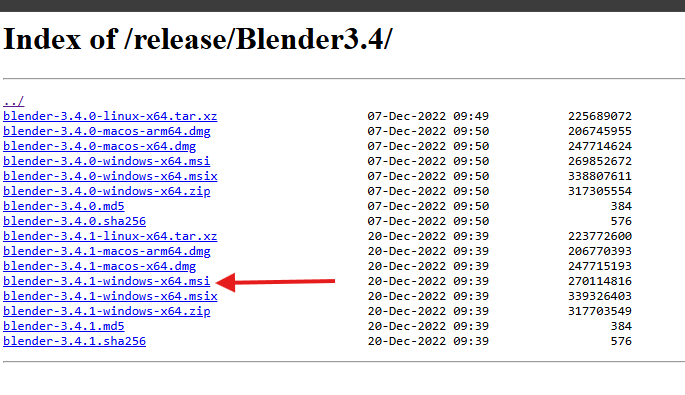
5. Download Blender 3.4.1 for Windows
Now choose the correct installer. For most Windows users,
this will be:
??
blender-3.4.1-windows-x64.msi
If you’re using a Mac or Linux system, choose the version
that matches your platform.
Click this file to begin the download.
6. Organize Your Installer
While the file is downloading, open your avatar folder
(the one you created in Chapter 1).
Place the downloaded Blender installer in that folder as well.
? Why? This keeps everything in one place-your avatar, tools, and plugins. If you ever need to reinstall or troubleshoot, you’ll have the exact working version ready.
7. Install Blender
Once the download finishes, double-click the .msi file and follow the installer instructions, just like with any other Windows program.
After installation, you’re ready to move on to the next step: installing the CATS plugin.
? Tip to Remember
If you install a different version of Blender than shown here, the CATS plugin might crash, fail to load, or break your avatar workflow. Stick to version 3.4.1 unless this guide says otherwise
Chapter 3 -Installing the CATS Plugin in Blender
?? Learning Goal
By the end of this chapter, you’ll have the CATS plugin fully installed and ready to use in Blender 3.4.1. This essential tool helps you prepare avatars for VRChat quickly and efficiently.
??? Step-by-Step
Instructions
1. Download the Correct Version of the CATS Plugin
Go to the official GitHub page for the CATS plugin:
??
https://github.com/absolute-quantum/cats-blender-plugin/releases
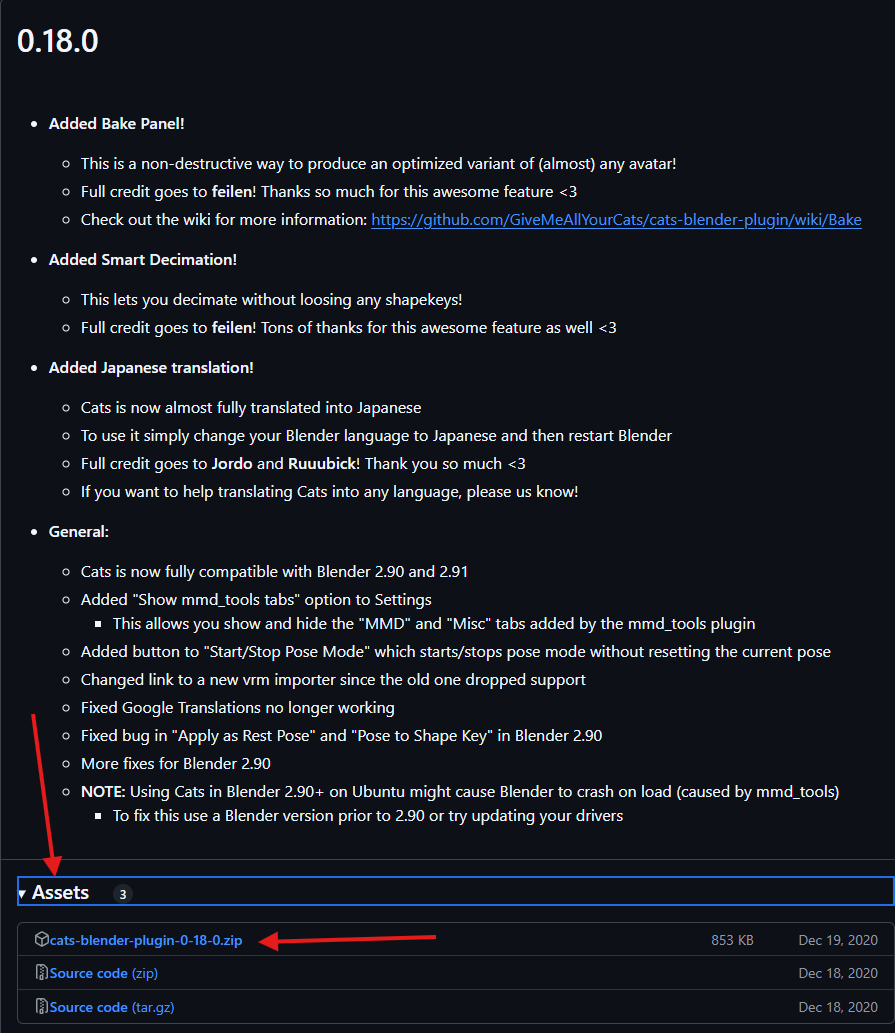
Scroll down to version 0.18.0, then open the Assets section and
click on the file cats-blender-plugin-0-18-0.zip.
? Place the downloaded .zip file in the same folder where you store all avatar-related files, just like we did with Blender.
2. Open Blender
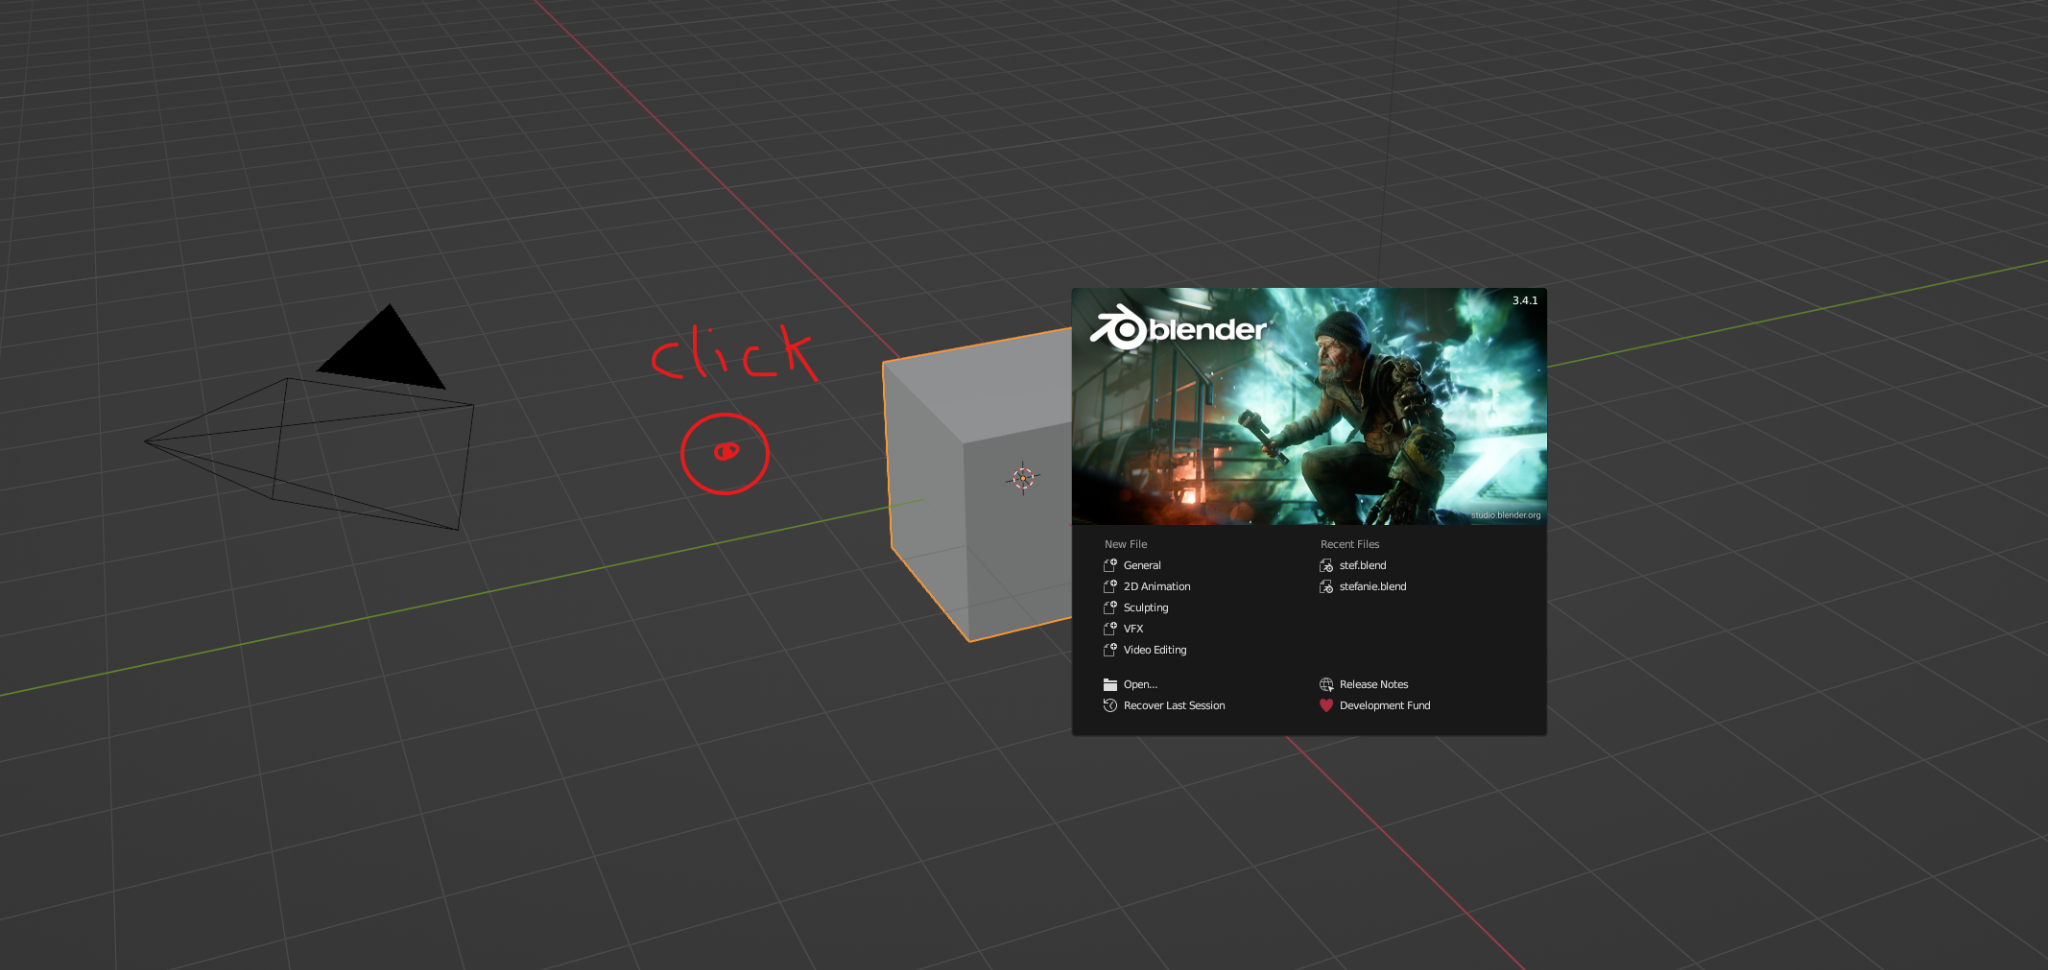
Double-click the shortcut for Blender 3.4.1 (it may
be on your desktop or in your Start menu).
Click anywhere outside the splash screen to close it.
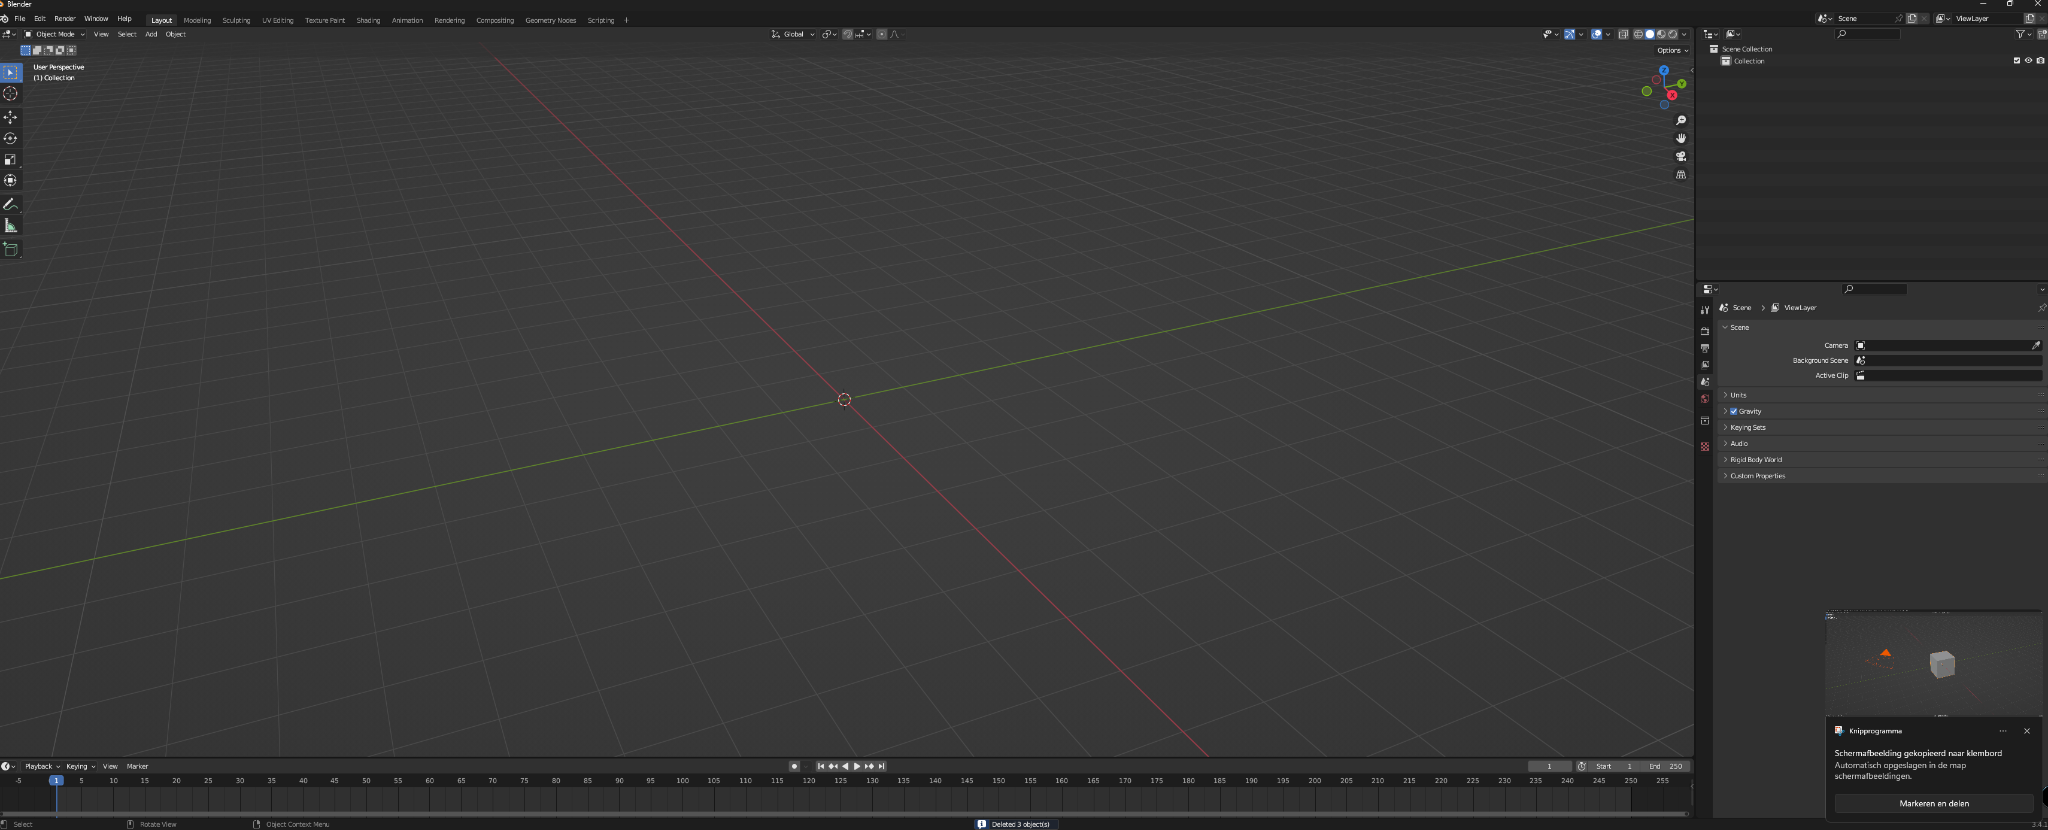
3. Clear the Scene
Press the A key to select all objects in the default scene, then press Delete on your keyboard to remove them.
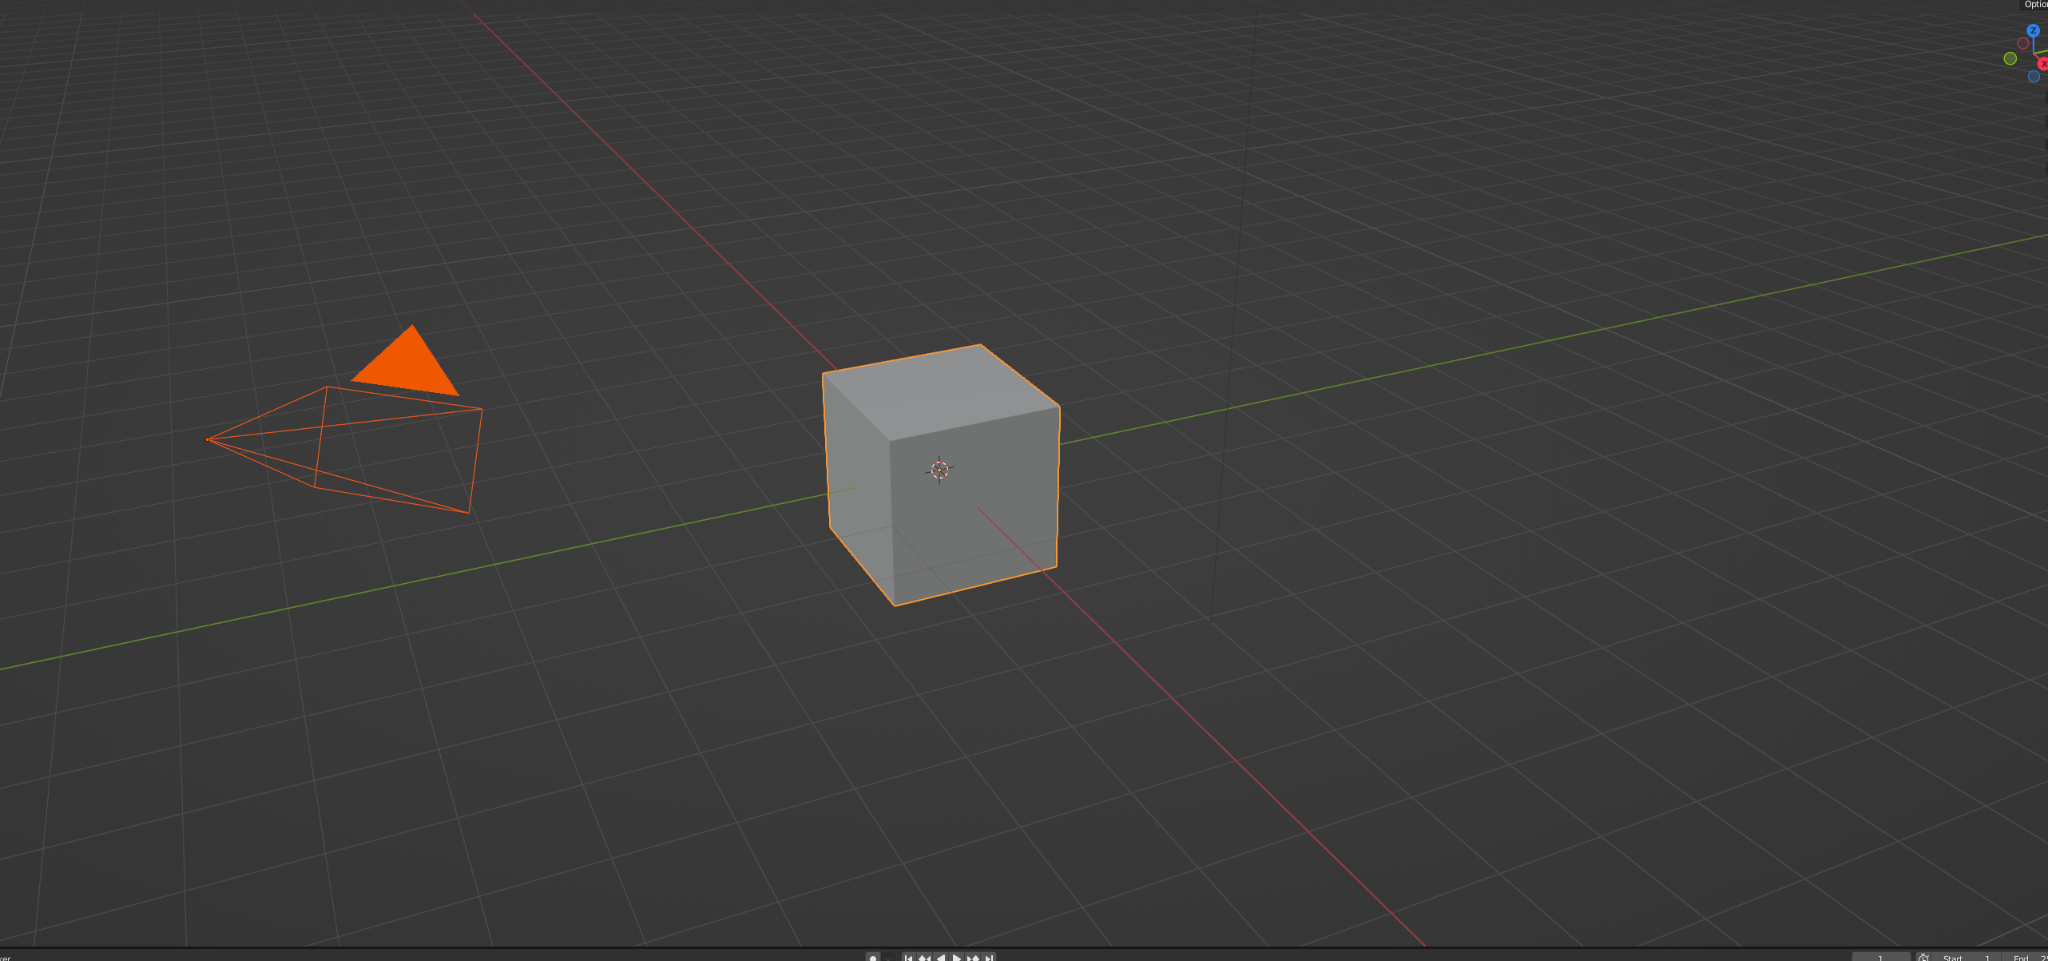
Now you're left with an empty workspace.
4. Open Blender Preferences
Go to the top-left menu bar and click:
Edit ? Preferences
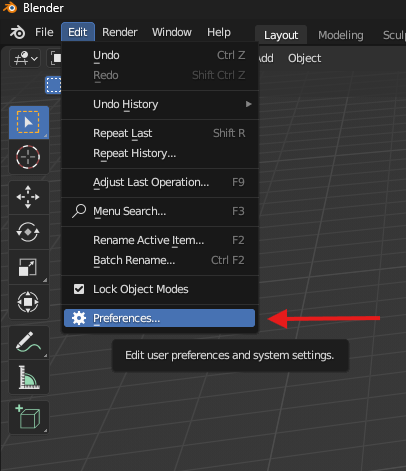 ??
[Screenshot: navigating to Preferences]
??
[Screenshot: navigating to Preferences]
5. Go to Add-ons ? Install
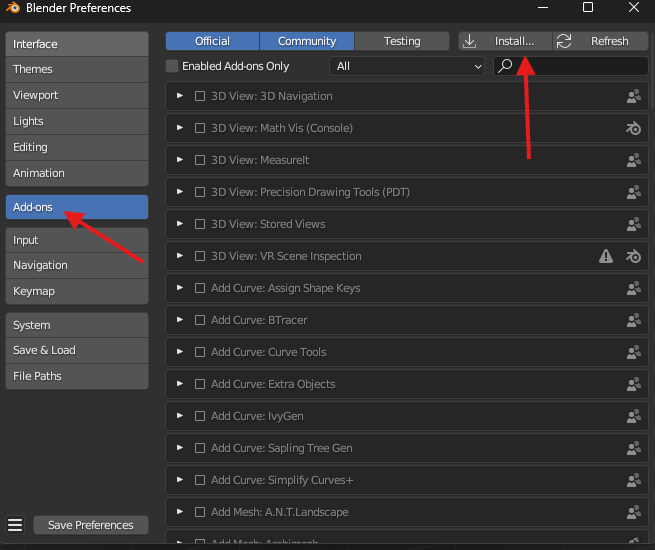
In the Preferences window:
- Click the Add-ons tab on the left
- Then click the Install… button in the top-right corner
6. Install the Plugin
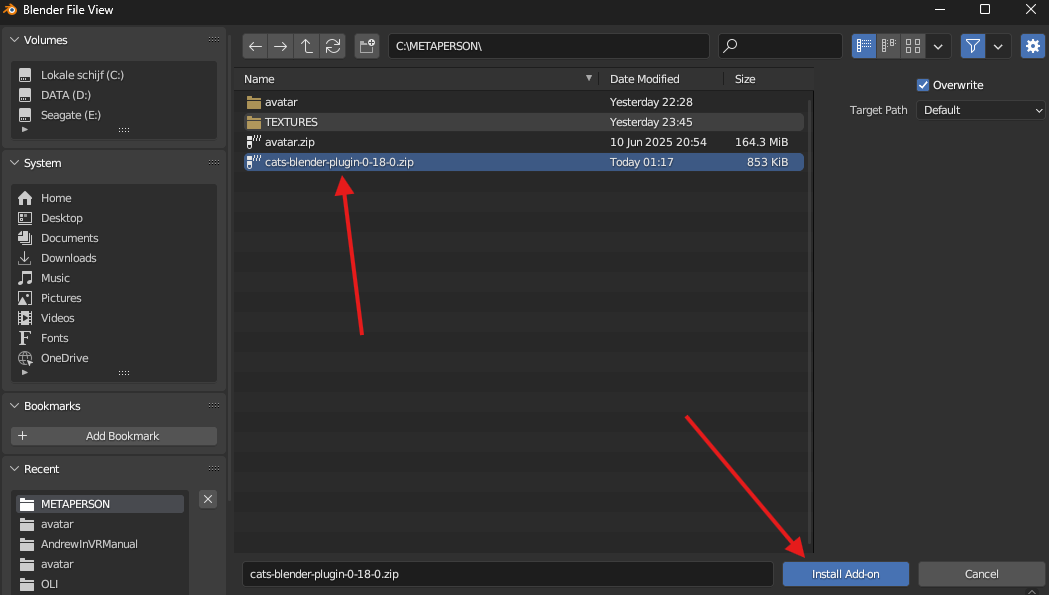
Navigate to the folder where you saved the plugin .zip file.
Click on the file once, then click Install Add-on in the bottom-right
corner.
7. Activate the Plugin
Once installed, you’ll see the CATS plugin appear in the list.
- Tick the checkbox to enable the plugin
- Then click the three lines in the bottom-left corner and select Save Preferences if Auto Save is not already checked
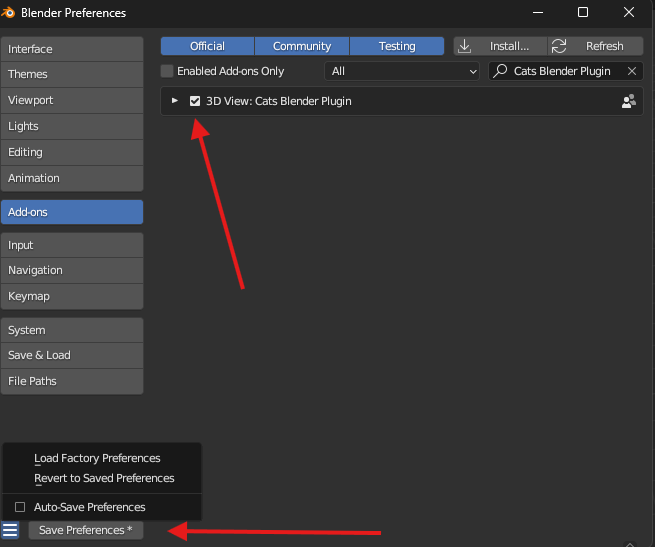
? Congratulations! You’ve now successfully installed and activated
the CATS plugin in Blender 3.4.1.
?? Final Tip
Always double-check that the plugin version and Blender version match the ones recommended in this guide. Even small mismatches can cause Blender to crash or features to disappear.
Chapter 4 -Preparing Your Avatar Model in Blender
?? Learning Goal
In this chapter, you'll learn how to import your FBX avatar, organize the mesh, and prepare the UV maps for optimal performance in Unity and VRChat.
??? Step-by-Step
Instructions
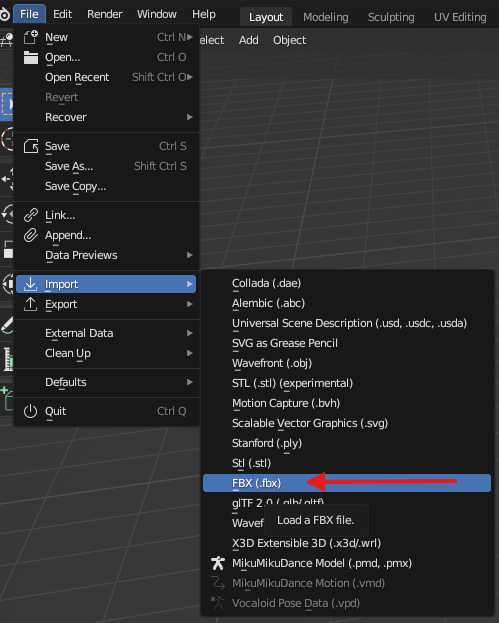
1. Import the Avatar
Go to File > Import > FBX (.fbx)
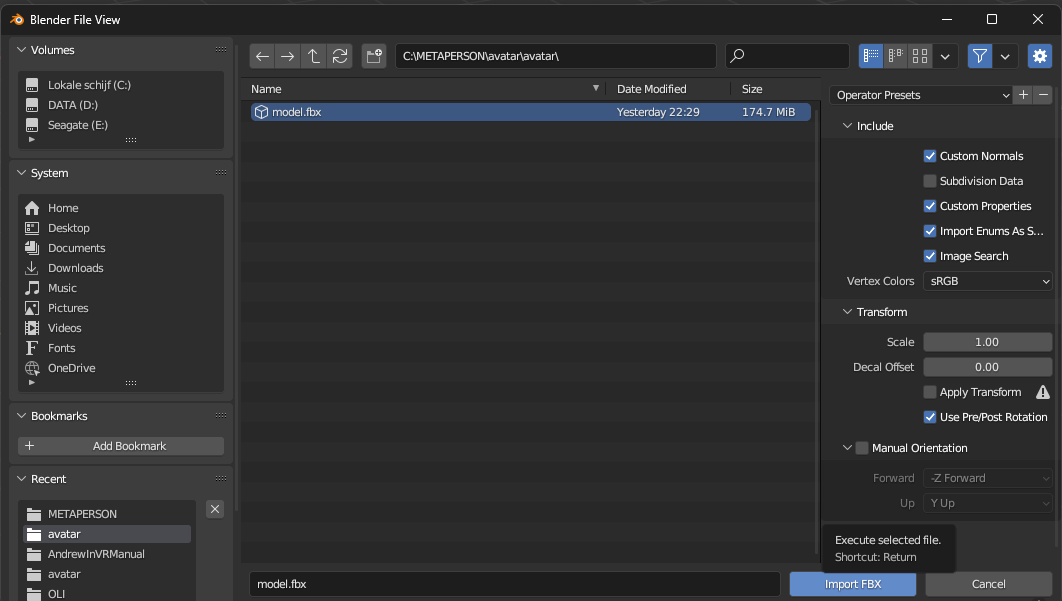
2. Locate and Import Your File
Navigate to the folder where your avatar FBX is stored, select it, and click Import FBX.
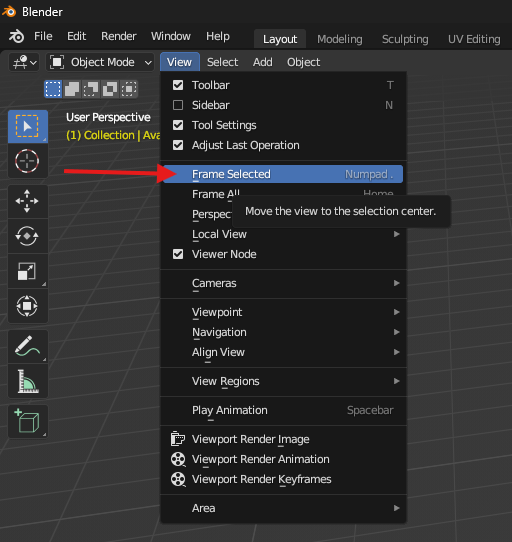
3. Focus the View on Your Avatar
Press the A key to select everything, then go to View > Frame Selected to bring the model into view.
4. Enable Texture Preview
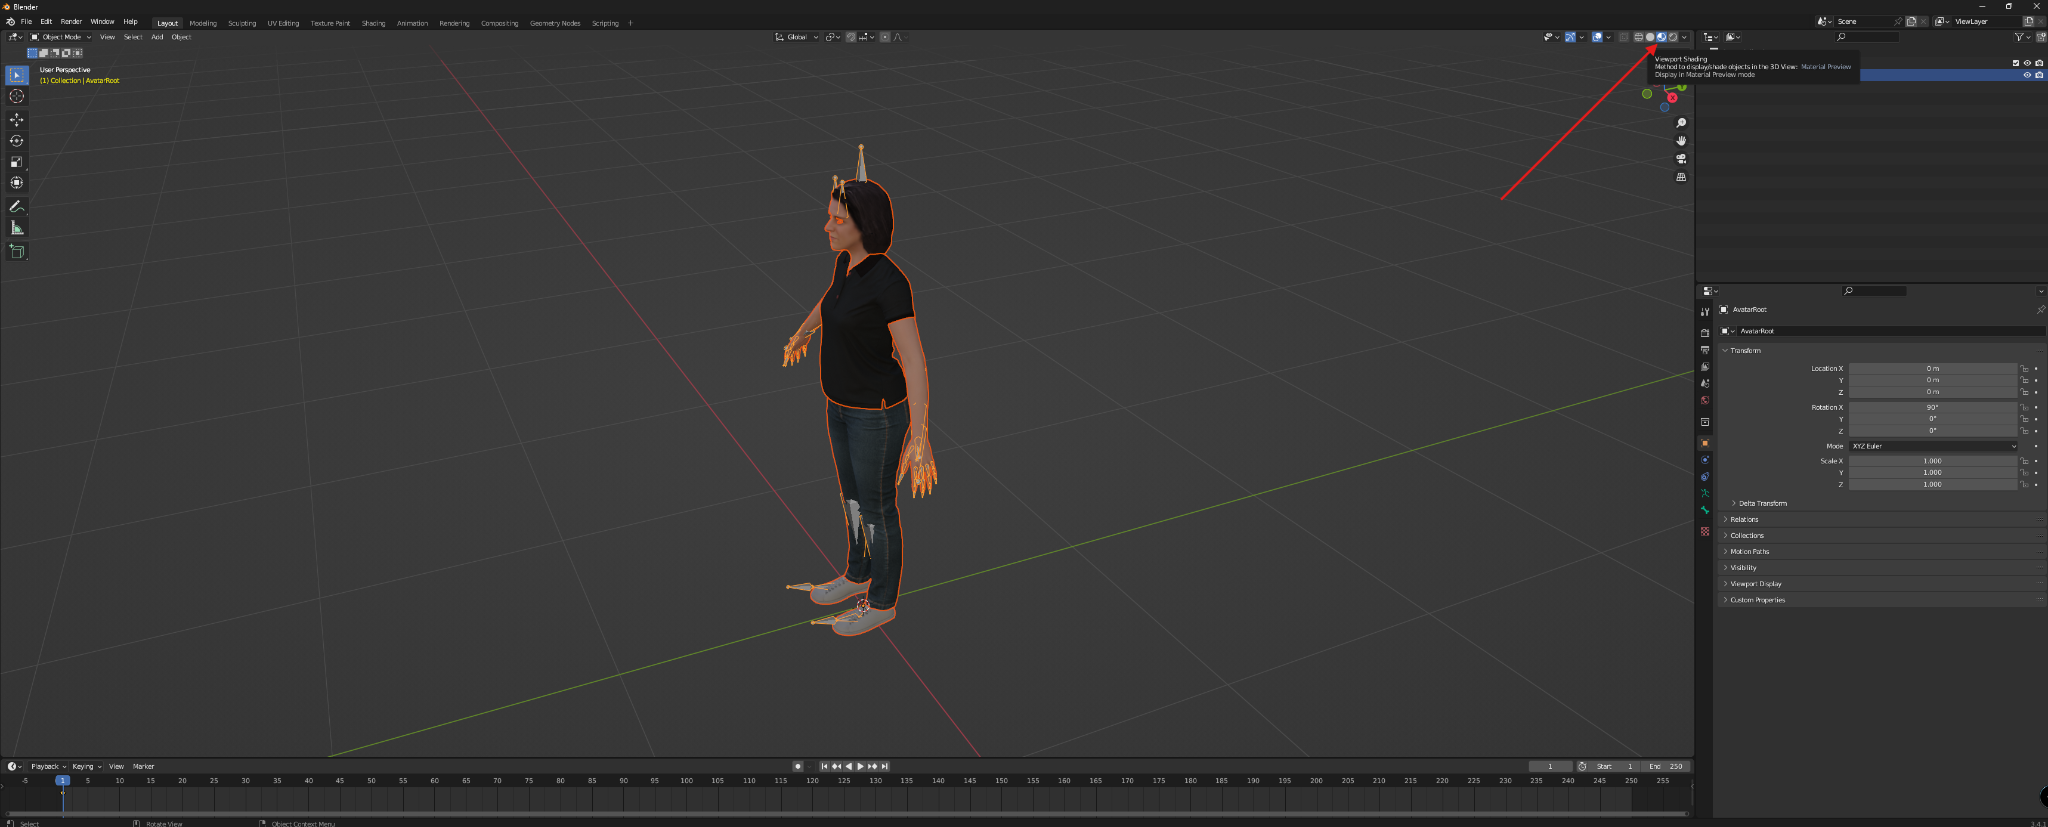
Click the Viewport Shading icon to enable material preview and see your avatar's textures.
5. Open the CATS Panel
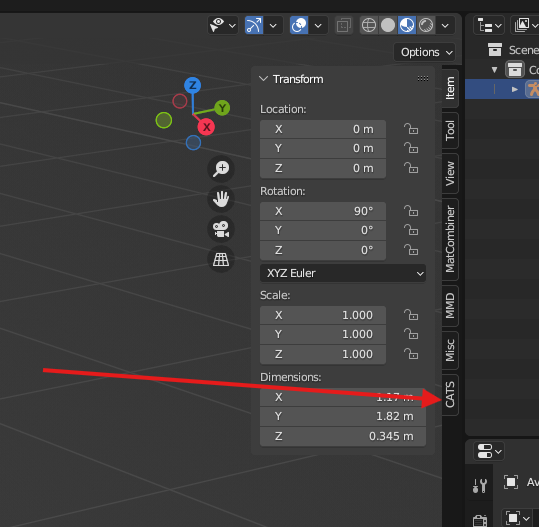
Press N on your keyboard to open the right-side toolbar. Click the CATS tab.
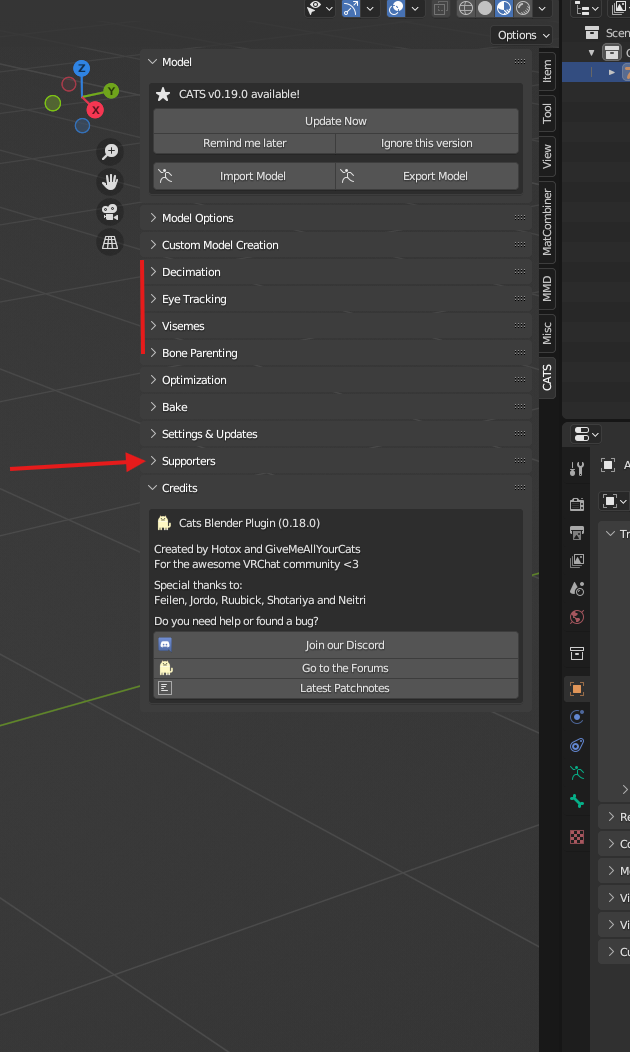
?? You can drag the panel border to make it wider and collapse
the “Supporters” section for better visibility.
6. Join the Mesh
Hover your mouse over the avatar and press A again to
make sure everything is selected.
Then expand the Model Options section in CATS and click Join Meshes
> All.
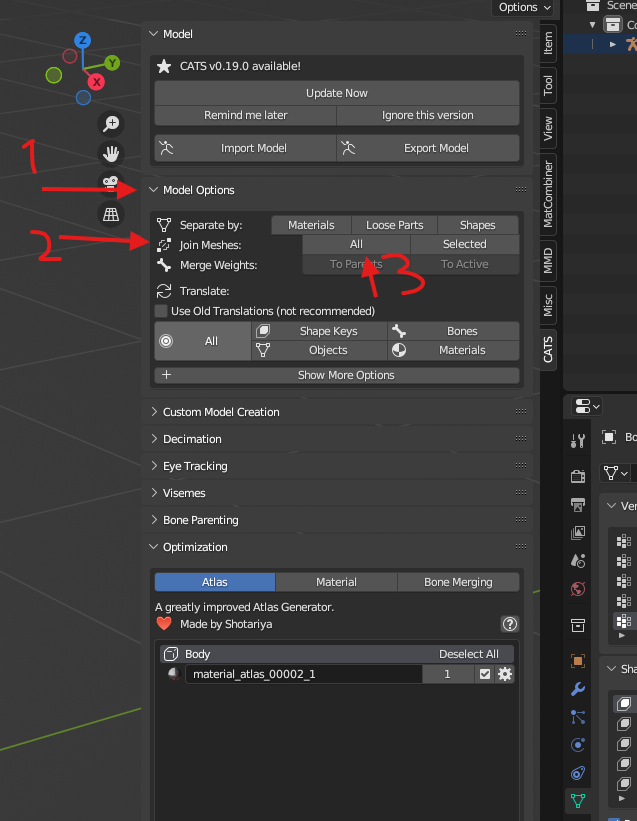
? Now your avatar is merged into one clean object, ready for
optimization.
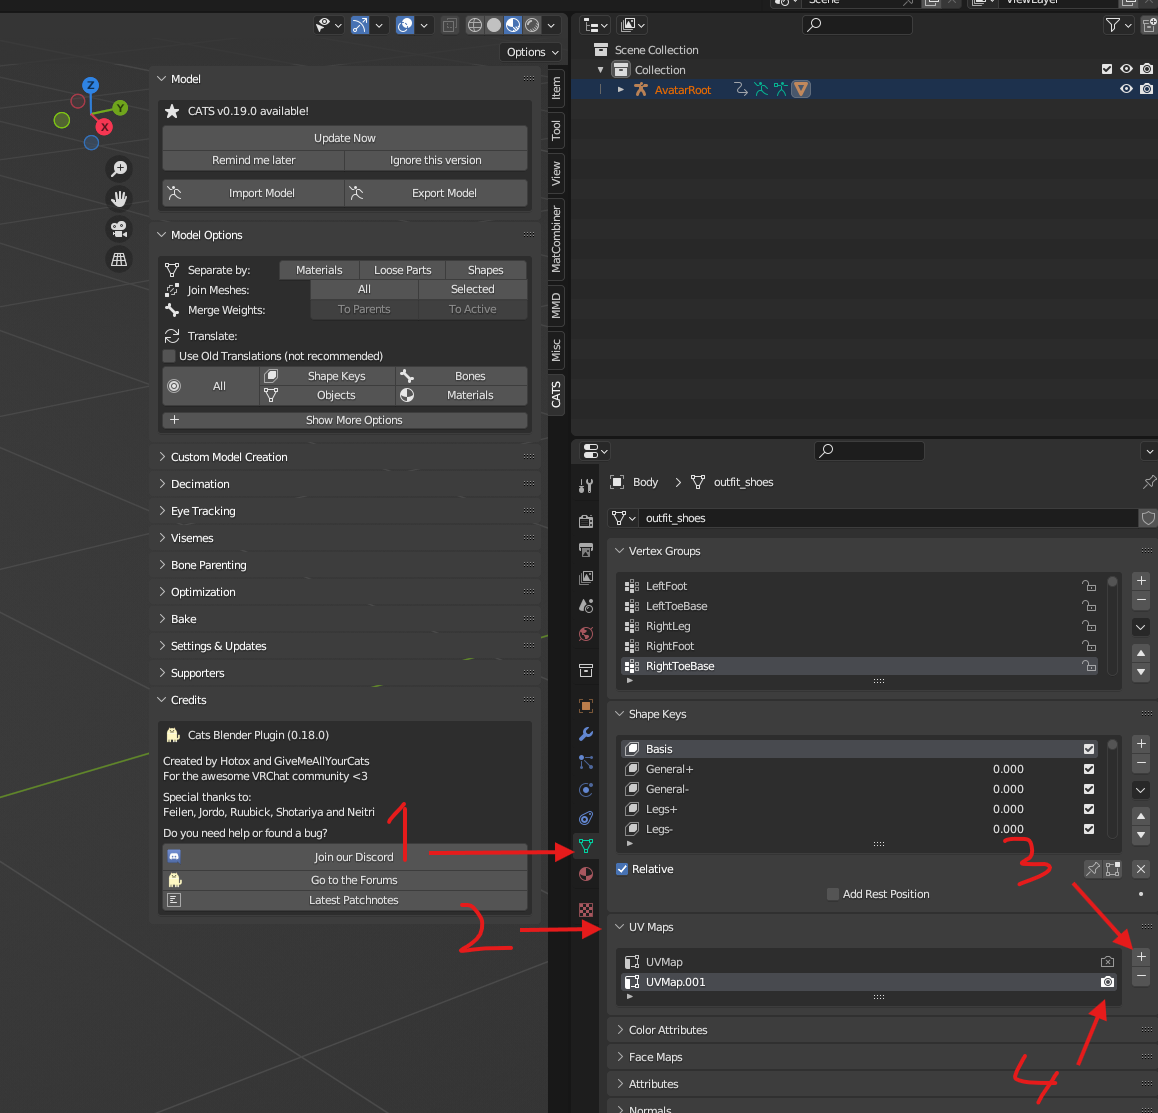
7. Add a Second UV Map
Let’s now add an extra UV map for baking and optimization:
?? [Screenshot: Add new UV map]
- Go to the Object Data Properties tab (green triangle icon)
- Scroll to UV Maps
- Click the ? to add a second UV map (usually named UVMap.001)
- Click
the camera icon next to it to make it active
See here (This is how it what it should look like):
?? What is a UV map?
A UV map is like a pattern layout - it tells 3D software how to wrap a 2D image
(like a texture) onto a 3D model.
Having a clean, separate UV map is important when you're baking textures for
optimization.
8. Save the Material Atlas
Open the Optimization section in the CATS panel.
Click Save Atlas To… and choose your avatar folder.
?? You may be prompted to install a helper addon - follow the prompts if needed.
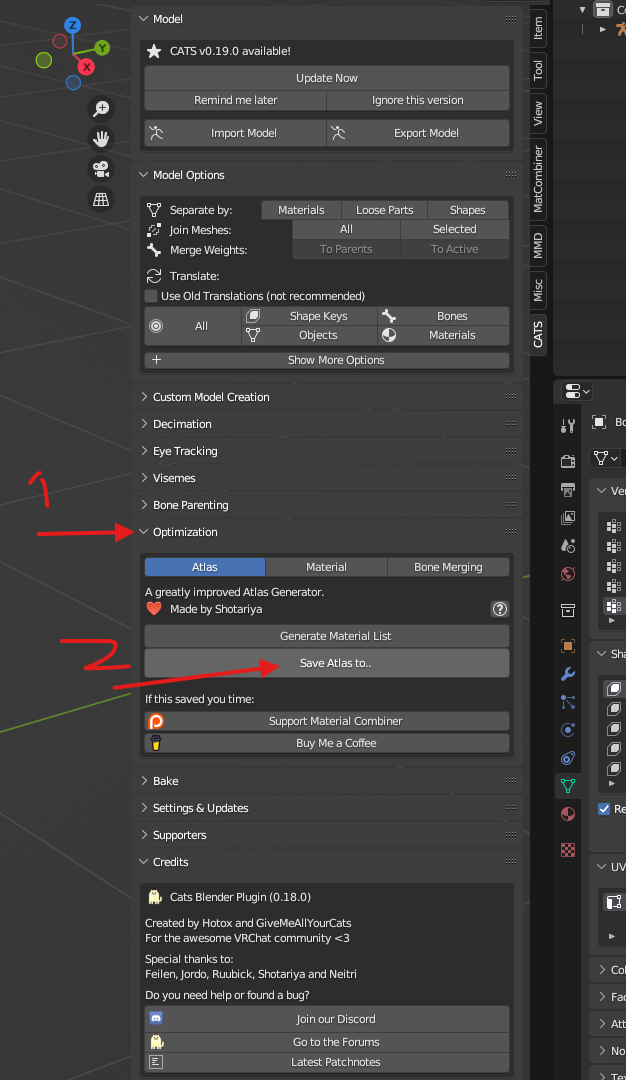
You’ll see your avatar’s textures change a little - that’s okay! You now have a
combined material.
9. Clean Up the UV Maps
Now let's finish up by cleaning and renaming the UV map:
- In Object Data Properties > UV Maps, delete the original UVMap
- Select
UVMap.001 and click the -button to delete it (don’t worry)
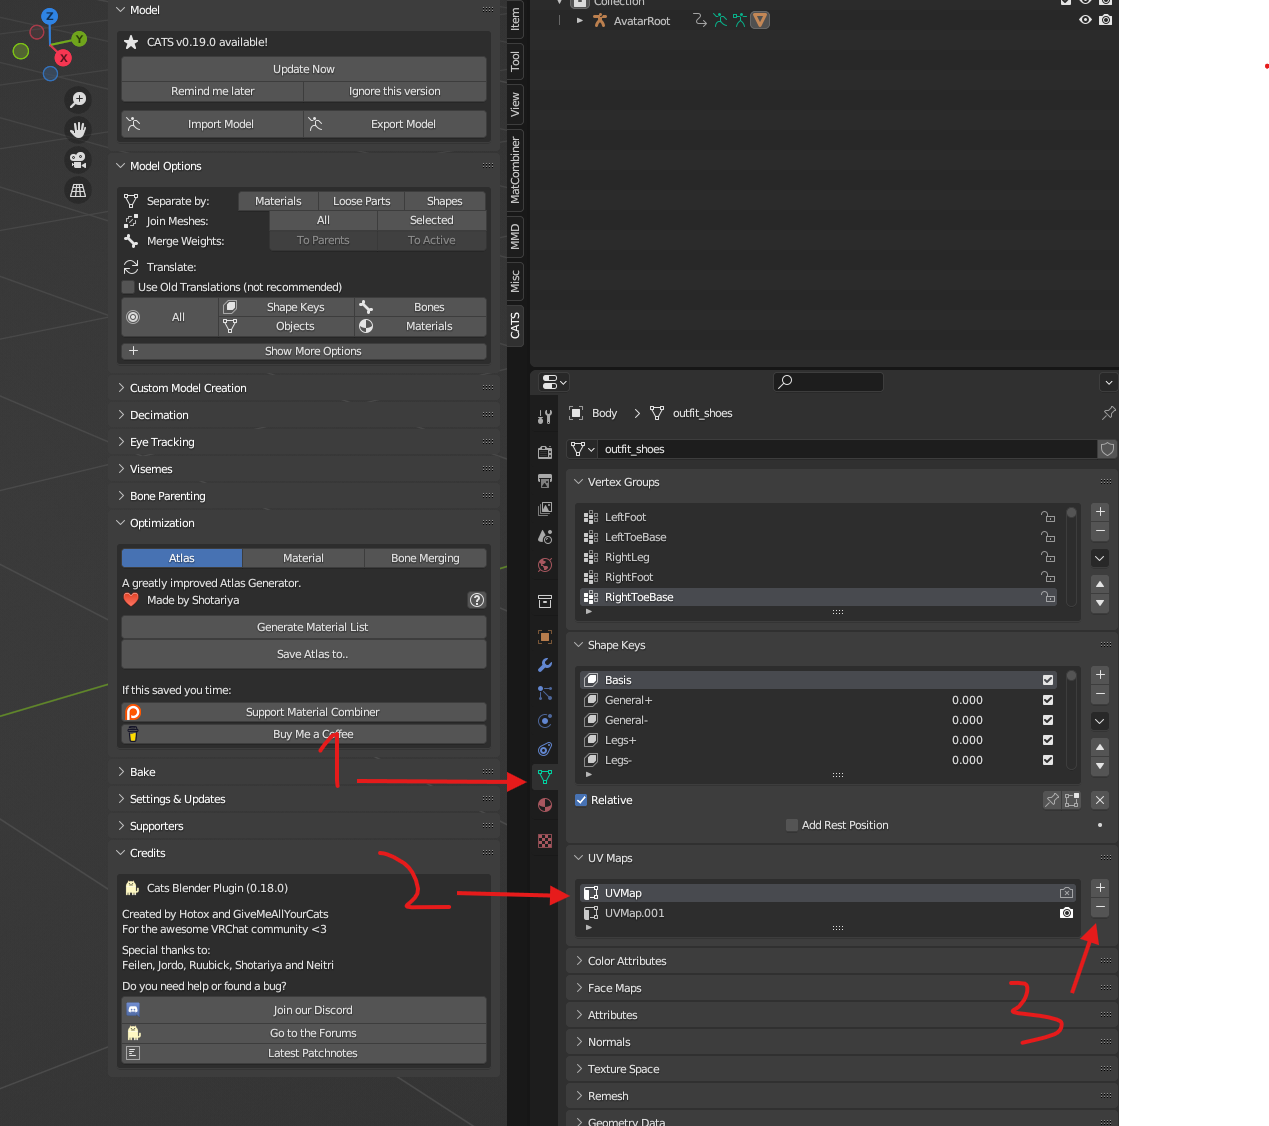
- Now
you'll be left with one UV map again - double-click its name and
rename it to UVMap
From this:

To This
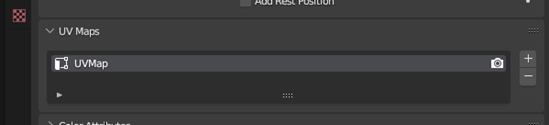
:
? Final Step -Export to FBX
for Unity
10. Save Your Blender File
Always click File > Save As and save your .blend before exporting.
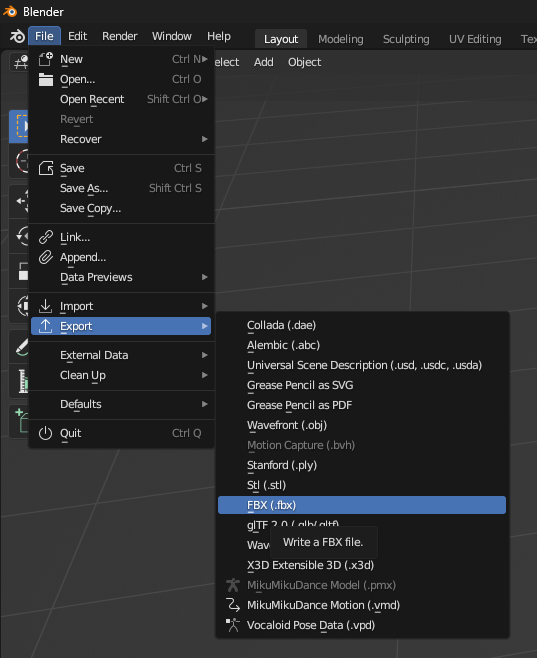
11. Export to FBX
Go to File > Export > FBX (.fbx)
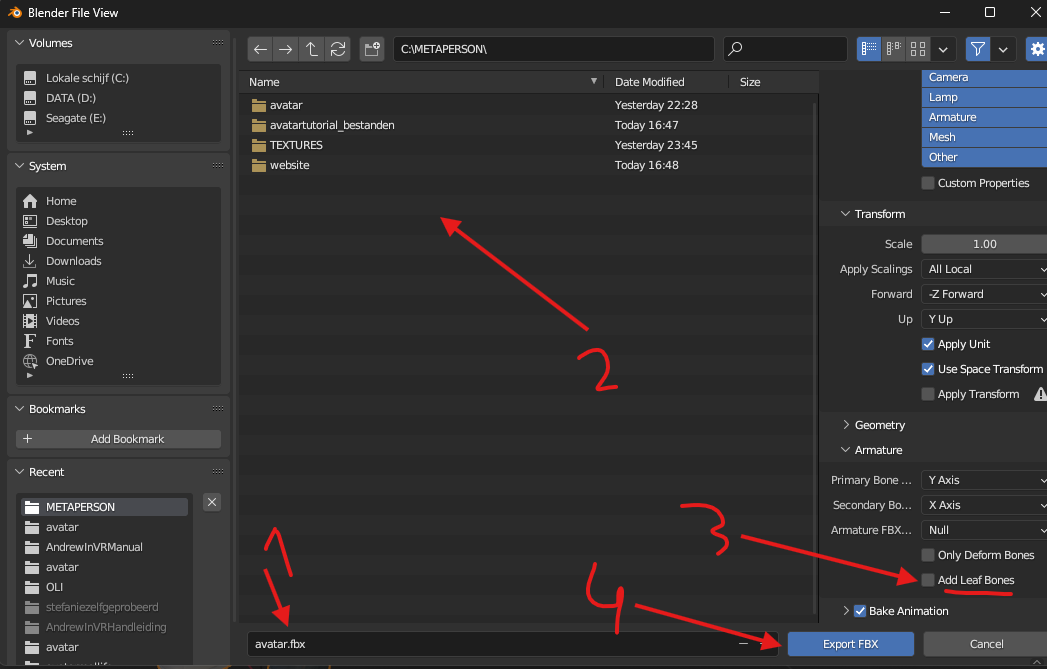
12. Set Export Options
- Choose your target folder (e.g. C:\METAPERSON\avatar)
- Name the file avatar.fbx
- In the right panel under Armature, uncheck Add Leaf Bones ? very important!
· Then click Export FBX.
?? Final Tip
Keep all related files (textures, Blender file, exported FBX, CATS plugin ZIP) together in a single folder. This makes it much easier to manage versions or switch avatars later.
?? Chapter 4 -Setting Up Unity and Preparing Your Avatar
Now that your avatar is ready in Blender, it’s time to jump
into Unity!
We’re going to create a new project, install the right tools, and make sure
your avatar looks perfect with proper textures and settings.
?? Step 1 -Install VRChat Creator Companion and Unity
If you haven’t installed Unity and the Creator Companion
yet, follow the official instructions on this page:
??
https://vcc.docs.vrchat.com/
Make sure you install Unity version 2022.3.22f1 - this is the one supported by VRChat.
Then download the Creator Companion directly here:
??
https://vrchat.com/home/download
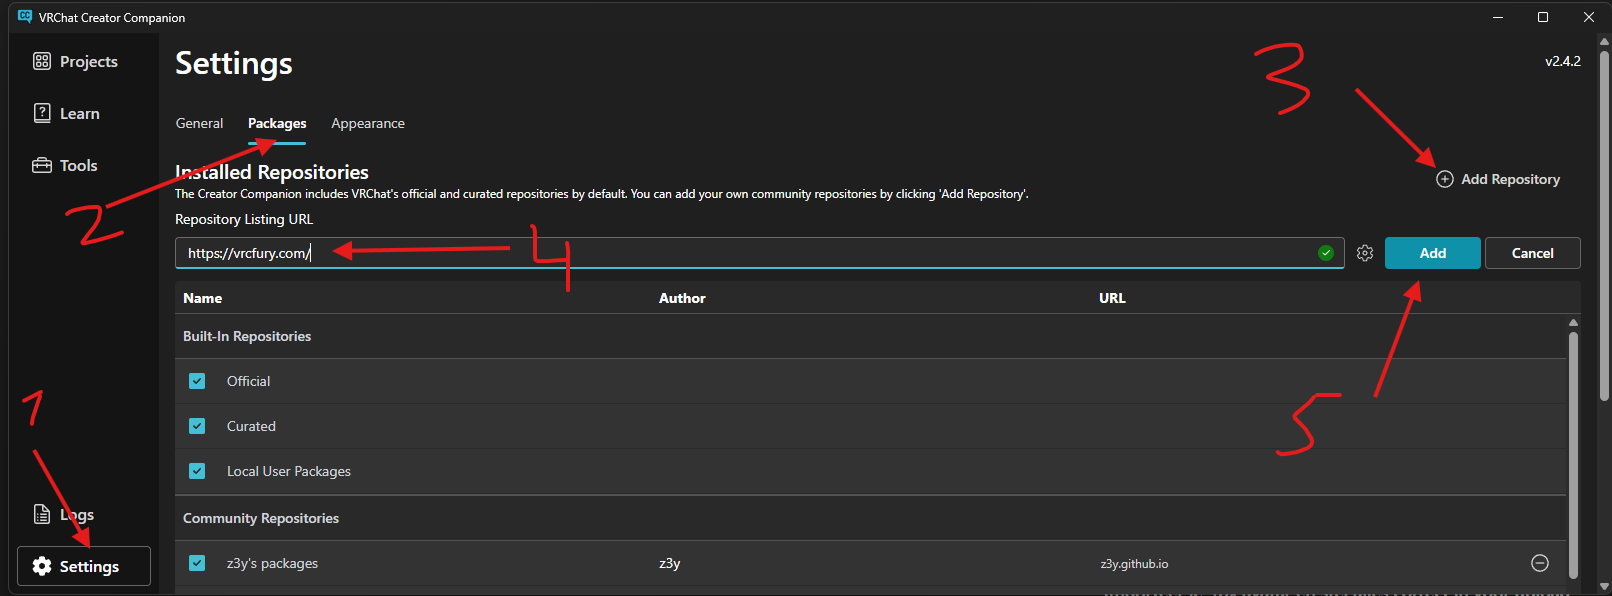
?? Step 2 -Add the VRCFury Repository
VRCFury is a super helpful system that makes it easy to manage things like menus, toggles and parameters for avatars.
?? If you want to learn more about what VRCFury is, check out https://vrcfury.com/
Instead of clicking the button on the website (which sometimes doesn’t work), we’ll add it manually inside the Creator Companion:
- Go to Settings
- Click the Packages tab
- Click Add Repository
- Paste this URL: https://vrcfury.com/
- Click
Add and wait until it's fully loaded
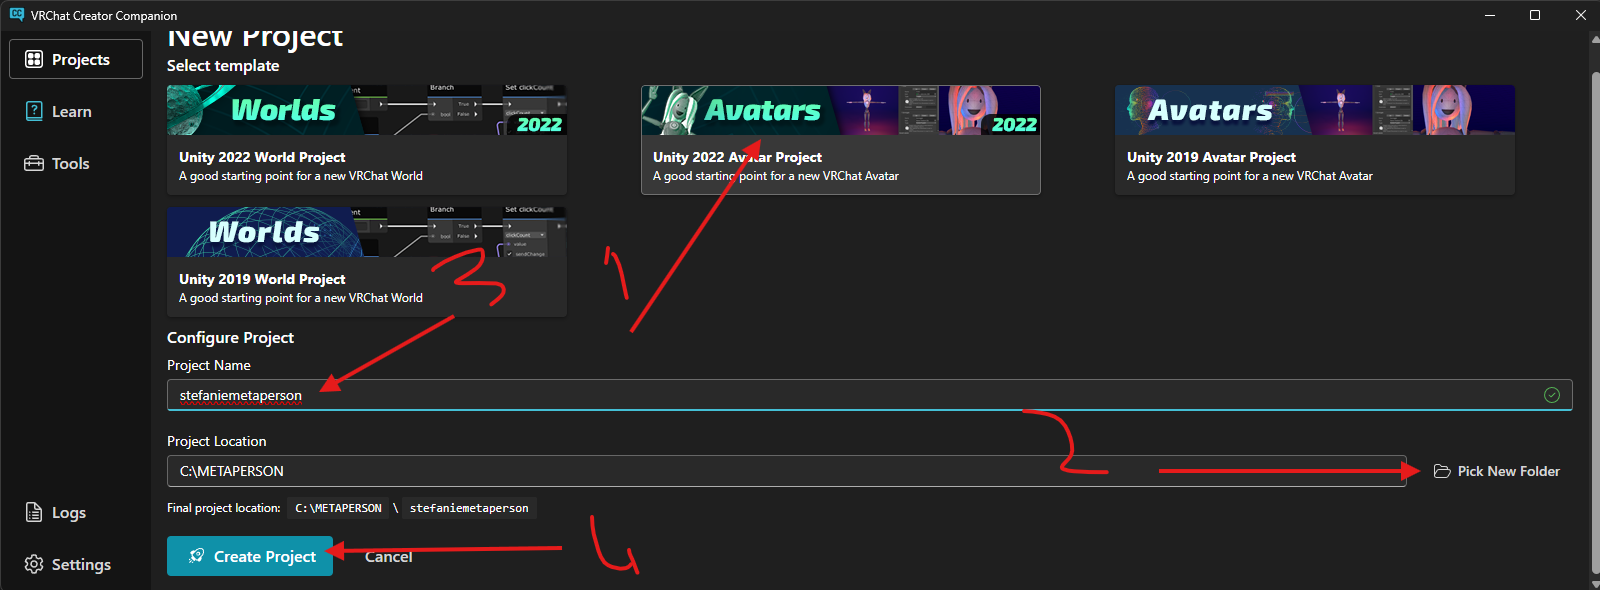
?? Step 3 -Create a New Avatar Project
??Go to the Projects tab
- Click Create New Project
- Choose the Unity 2022 Avatar Project template
- Pick a folder where you want to save it
- Give your project a name (like stefaniemetaperson)
- Click Create Project
Now wait for the project to be created and Unity to open -
this may take a few minutes.
?? Step 4 -Update SDKs and Install VRCFury

- In Creator Companion, go to Manage Project
- Click
the green arrows next to VRChat SDK - Base and VRChat SDK -
Avatars to update to the latest version
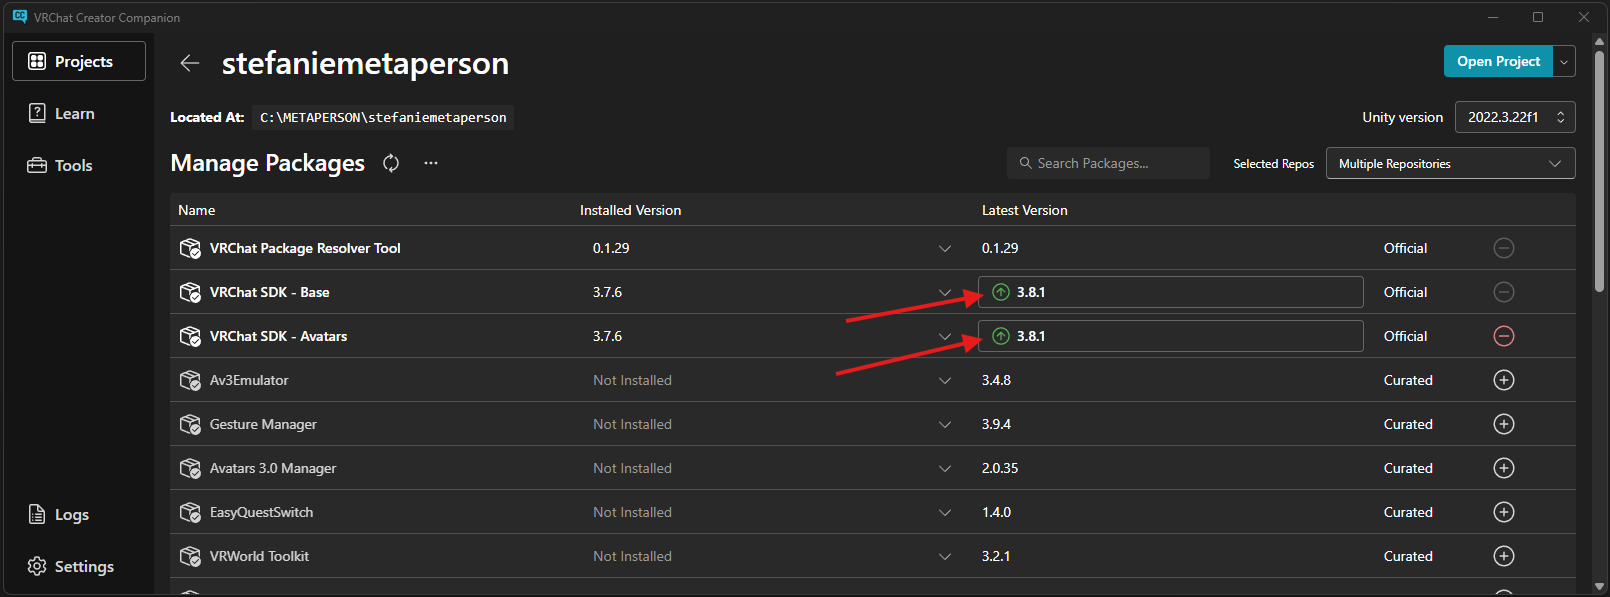
- Scroll
down until you find VRCFury and click the ?
to install it
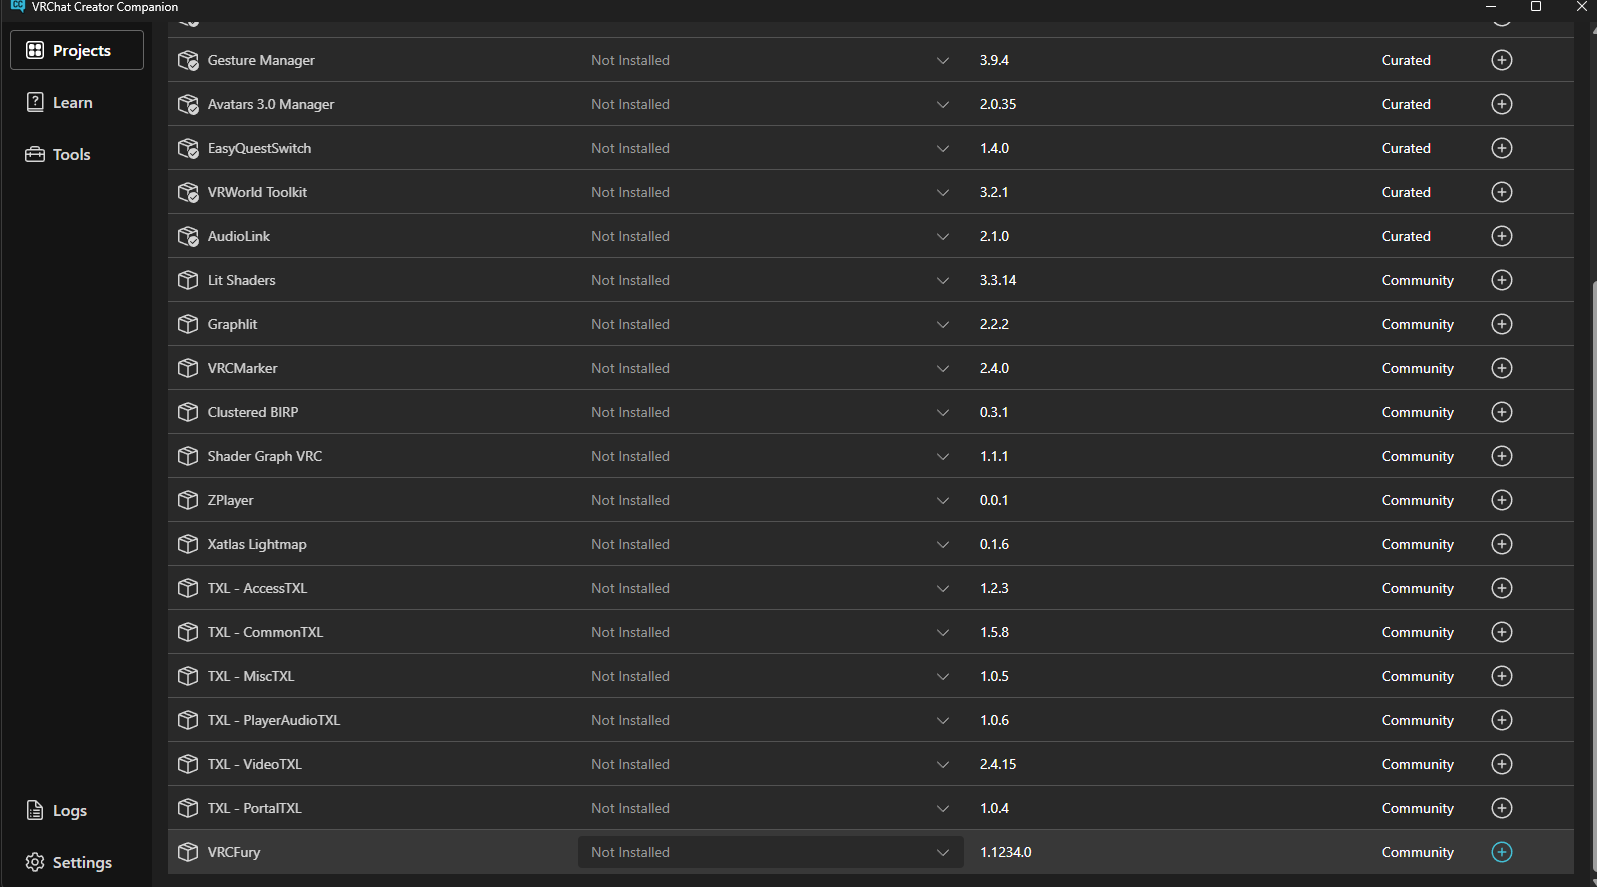
Once it’s done, click Open Project to launch Unity.
?? Step 5 -Import Your Avatar and Texture into Unity
?? [Screenshot: Assets > Import New Asset]
Inside Unity:
- Go
to Assets > Import New Asset
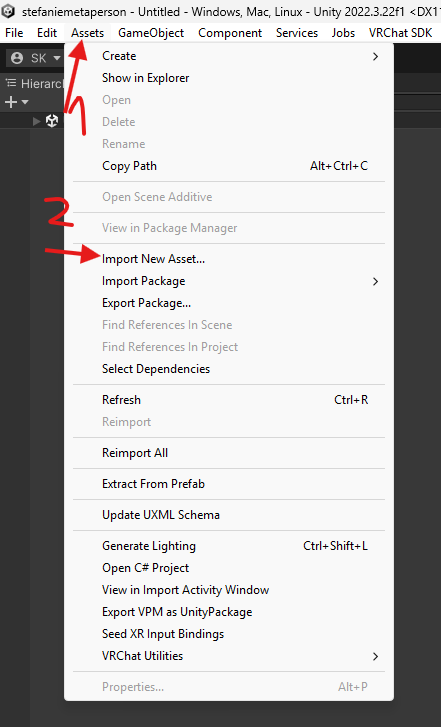
- Hold down Ctrl and select both your exported .fbx avatar and the atlas texture (e.g. Atlas_00003.png)
- Click
Import
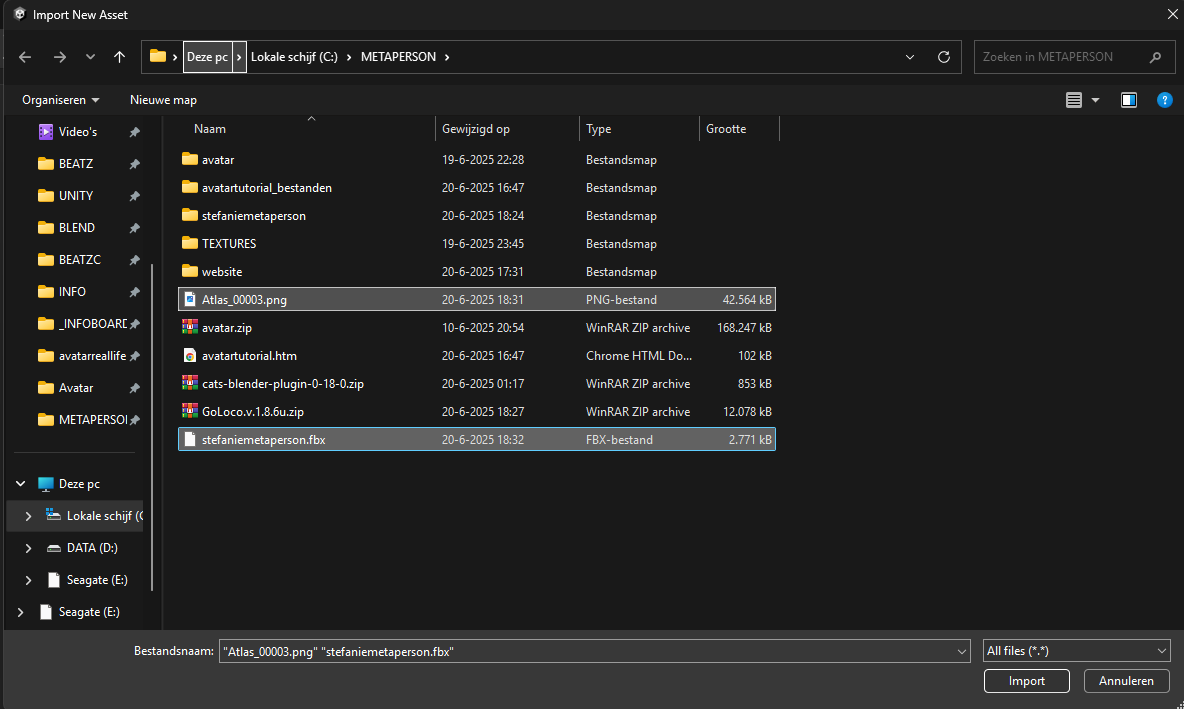
You should now see two files in the Assets folder: the FBX
and the texture.
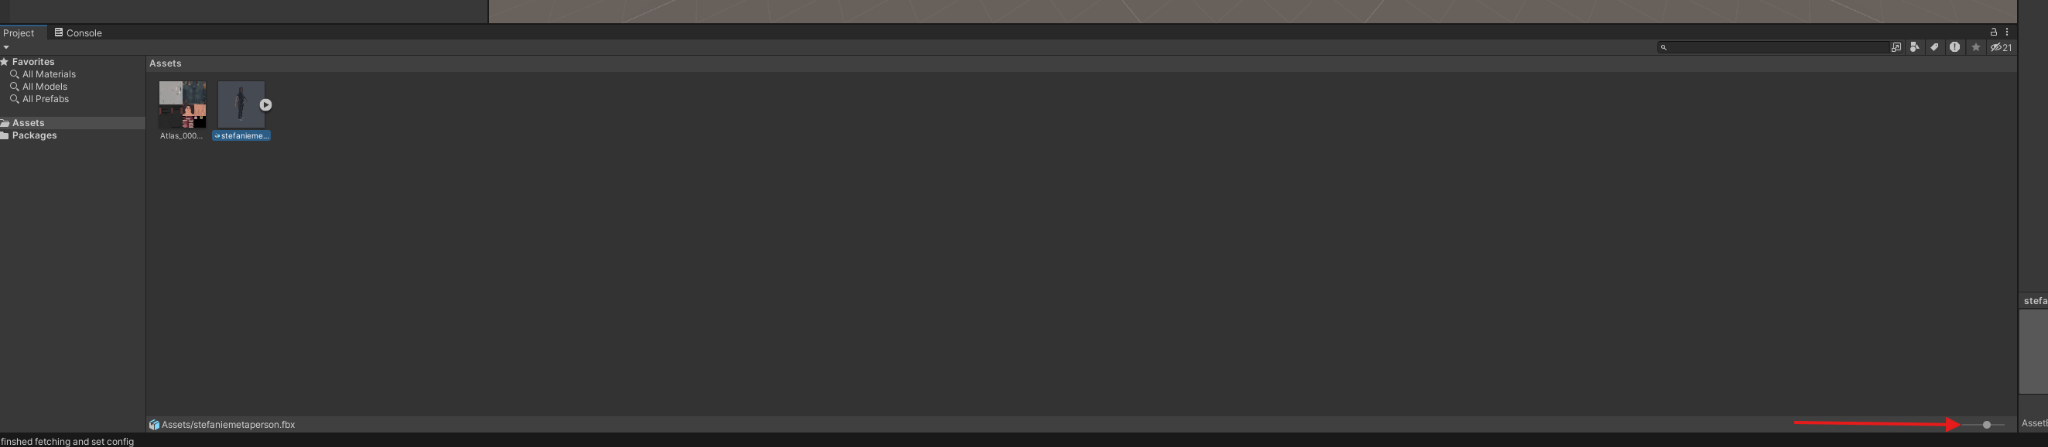
?? Tip: Drag the little dot in the bottom-right of the Assets window to make the icons bigger, so it’s easier to see.
?? Step 6 -Texture Settings
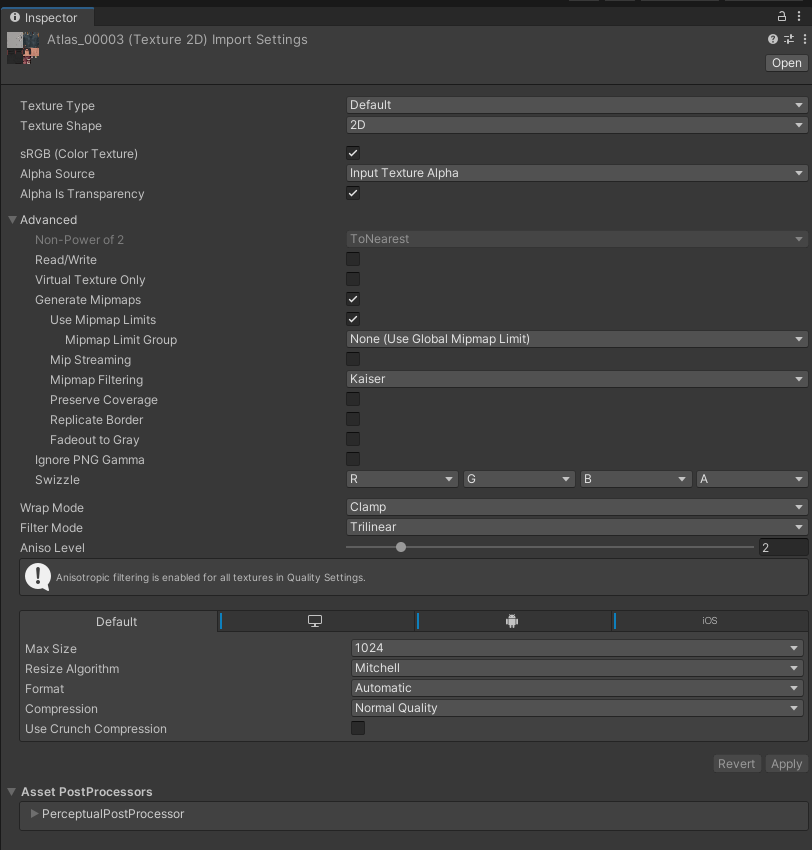
Click on the texture file (Atlas_00003.png) and go to
the Inspector panel. Apply the following settings:
- ? sRGB (Color Texture): Checked
- ? Alpha is Transparency: Checked
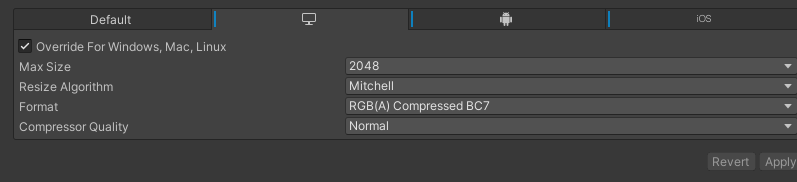
- ? Apply for PC:
- Format: RGB(A) Compressed BC7
- Max Size: 2048
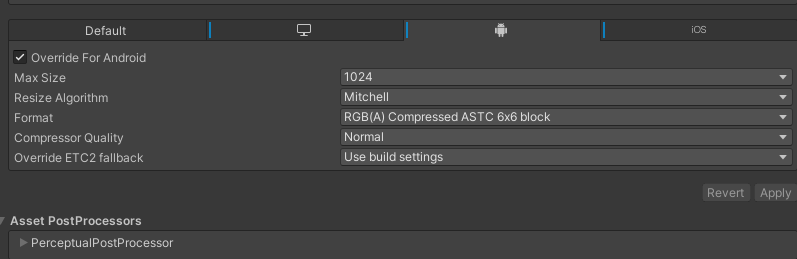
- ? Apply for Android:
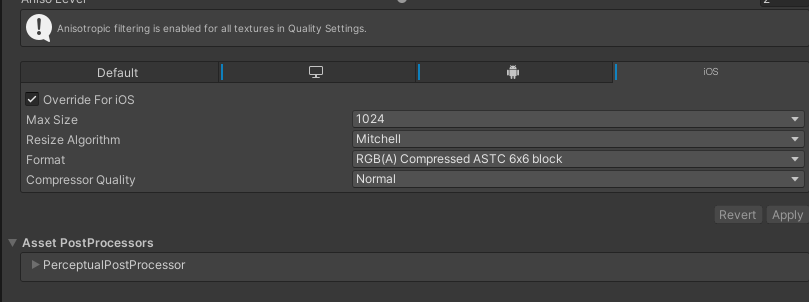
- Format: RGB(A) Compressed ASTC 6x6 block
- Max Size: 1024
- ? Apply for iOS:
- Format: RGB(A) Compressed ASTC 6x6 block
- Max Size: 1024
Click Apply when you’re done. Here are the settings:
?? Step 7 -Extract and Configure the Material
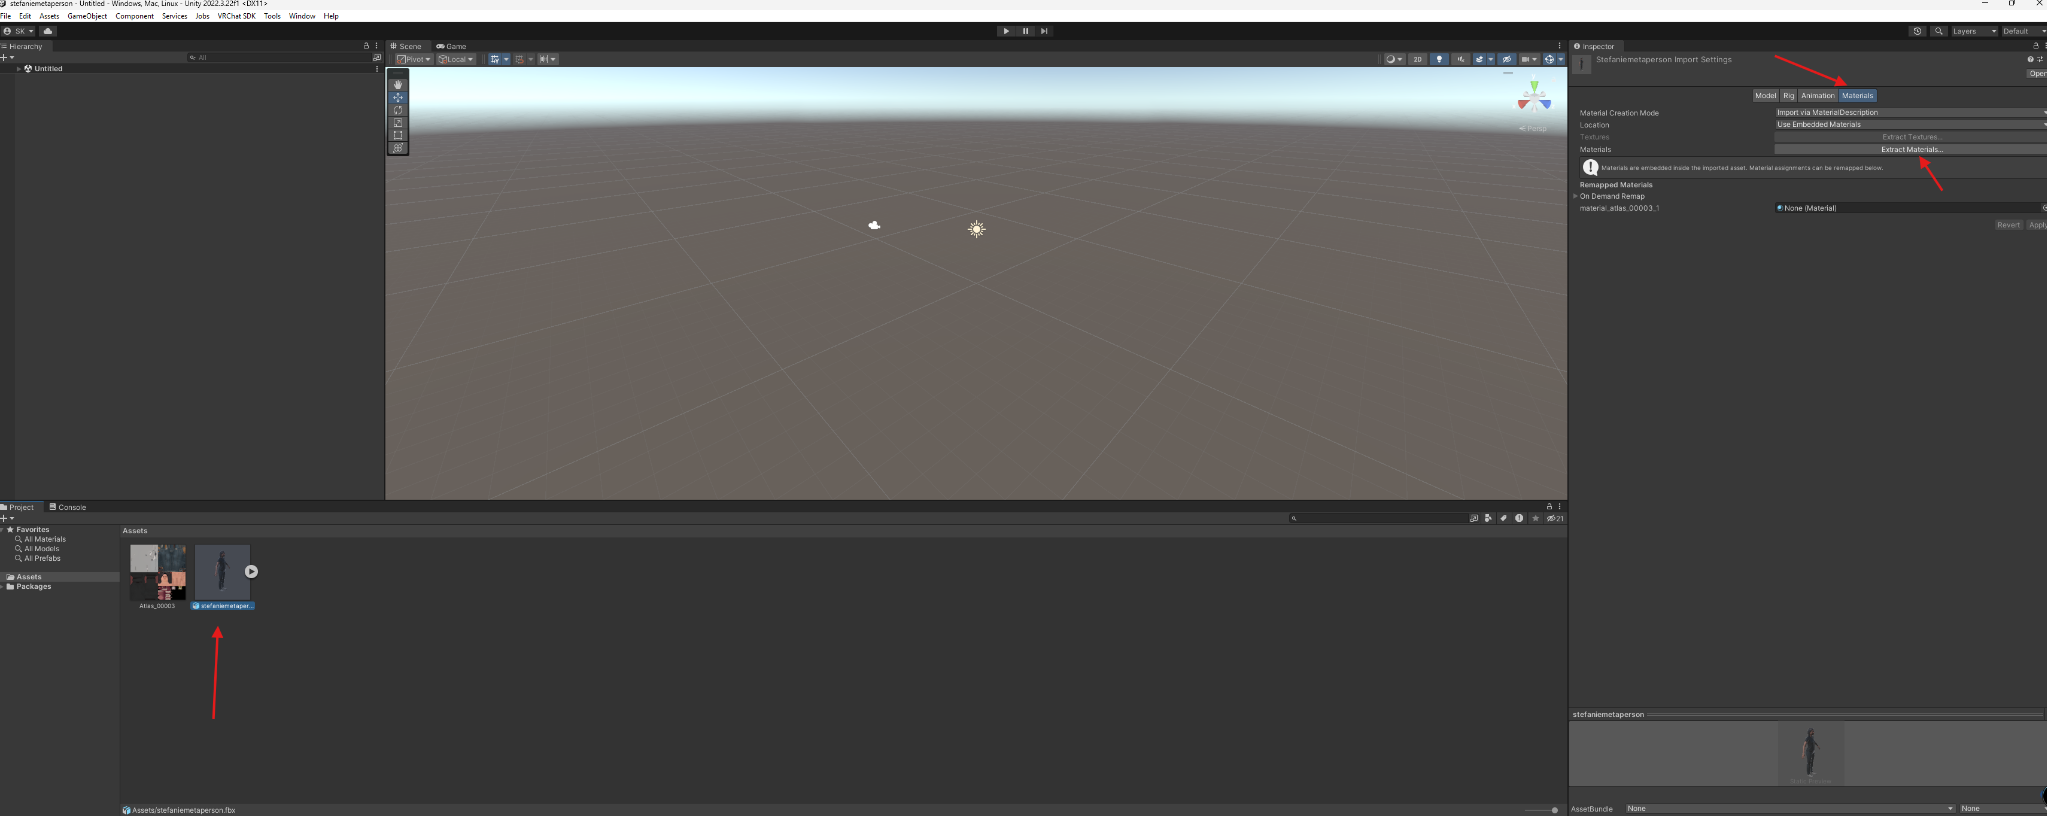
- Click on your FBX file
- Go to the Materials tab
- Click Extract Materials
- Choose the same folder you’re working in (just click "Select Folder")
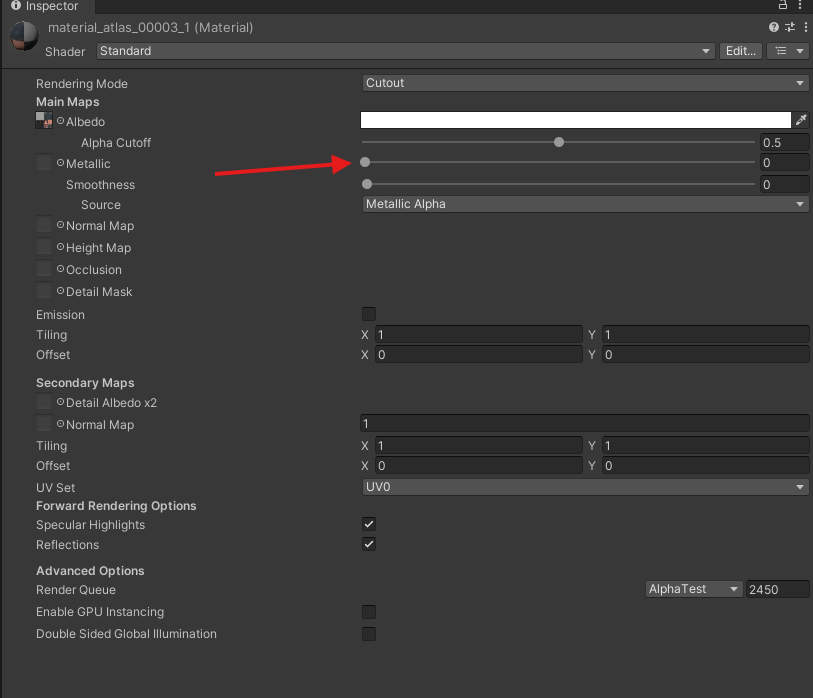
Now click on the newly created material and set the
following:
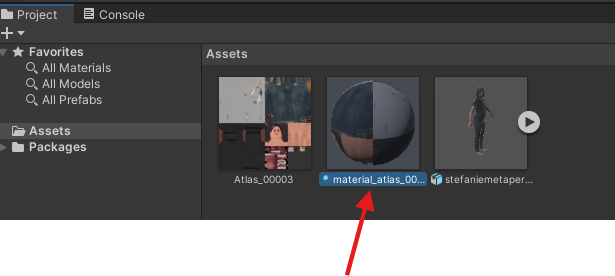
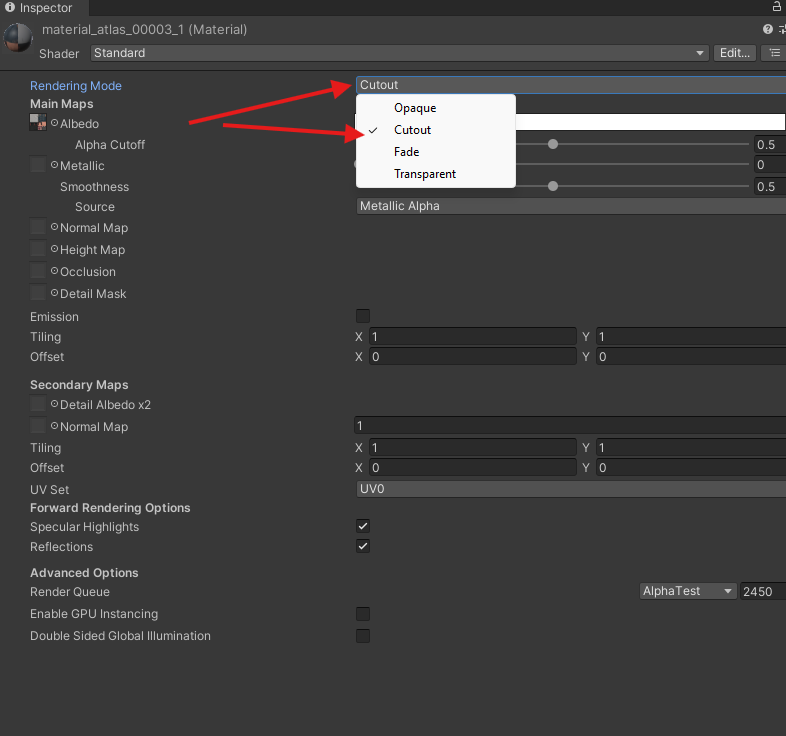
- Shader: Standard
- Rendering Mode: Cutout
- Set
both Metallic and Smoothness sliders to 0
?? Step 8 -Set Rig to Humanoid
?? [Screenshot: Inspector > Rig Tab]
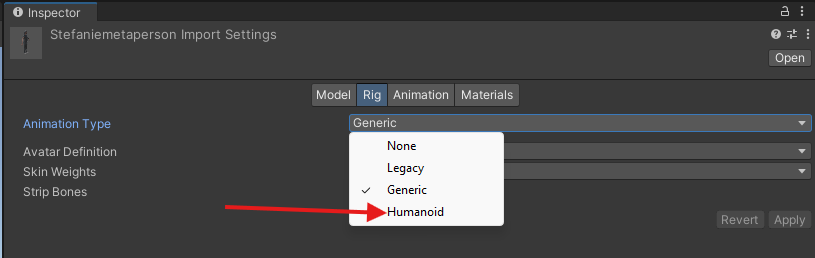
- Select your FBX again
- Go to the Rig tab
- Set Animation Type to Humanoid
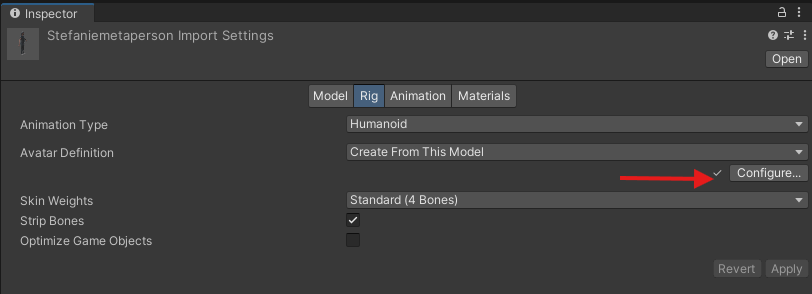
- Click
Apply
Now click Configure.
Go to the Head tab
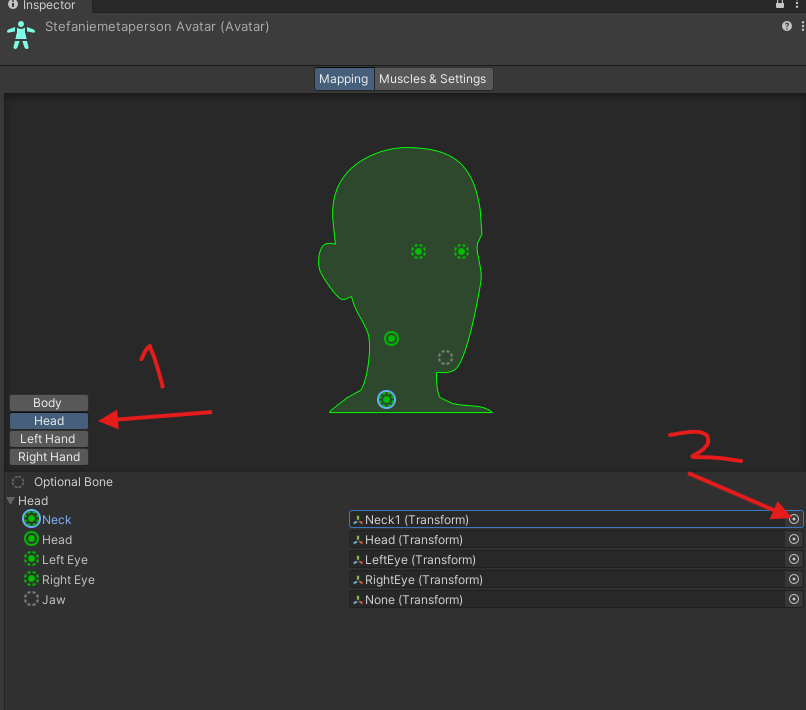
- Change Neck1 to just Neck
- Make
sure Jaw is set to None - this is important, or your mouth
may hang open in VR
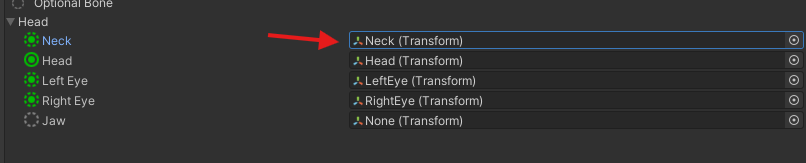
Click Apply and then Done.
? That’s it! You’ve now successfully set up your Unity project, installed VRCFury, imported your avatar, and correctly configured the materials, textures, and rig.
Let me know when you're ready for the next chapter, or if you'd like this exported as a downloadable file or placed into your tutorial document!
h. Ik bouw het op als volgt:
? Chapter 5 -Placing Your Avatar in the Scene and Setting Up the VRC Components
?? What You’ll Learn
In this chapter, we’ll bring your avatar into the Unity
scene and set everything up to get it ready for upload.
You’ll learn how to:
- Place your avatar in the scene
- Set the correct viewpoint
- Set up lip sync and fix viseme names if needed
- Configure eye tracking with proper values
- Use blendshapes for blinking, and how to create a blink key if it’s missing
Let’s get started!
?? Step 1 -Drag Your Avatar Into the Scene
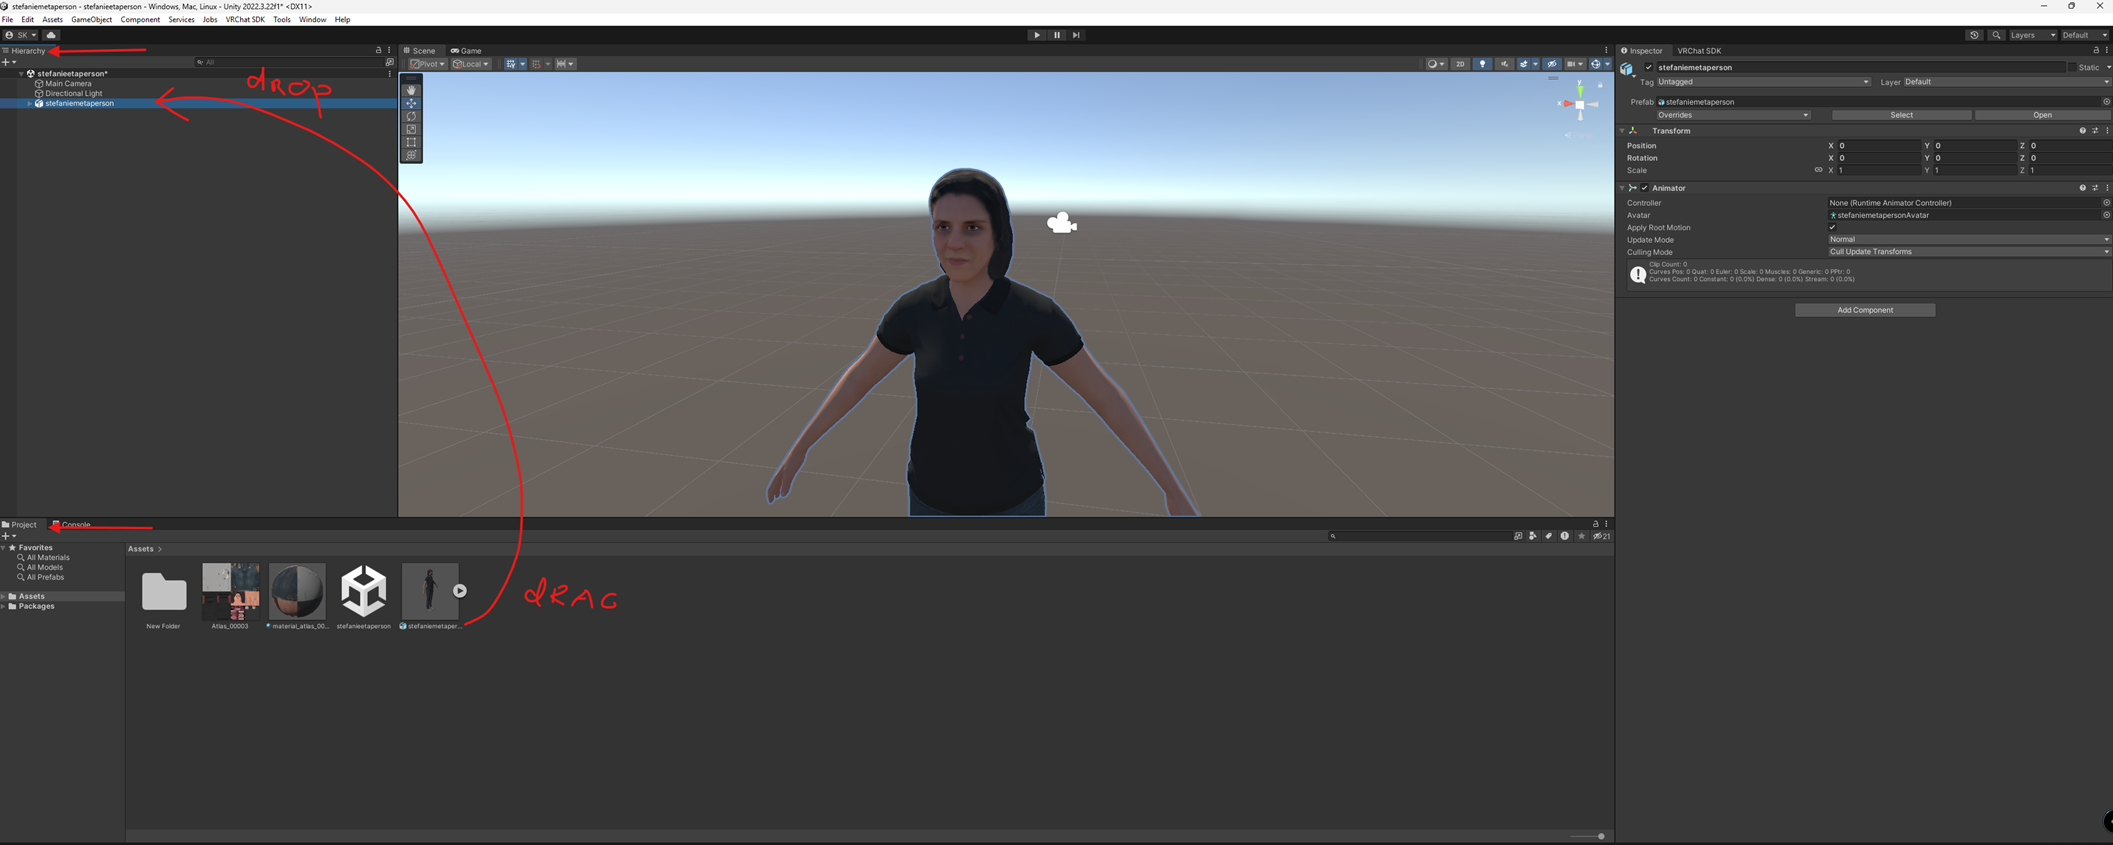
- Go to the Project window and find your .fbx file
- Drag it into the Hierarchy
- You’ll now see your avatar appear in the scene
?? Step 2 -Add the VRC Avatar Descriptor
- Select
the avatar in the Hierarchy
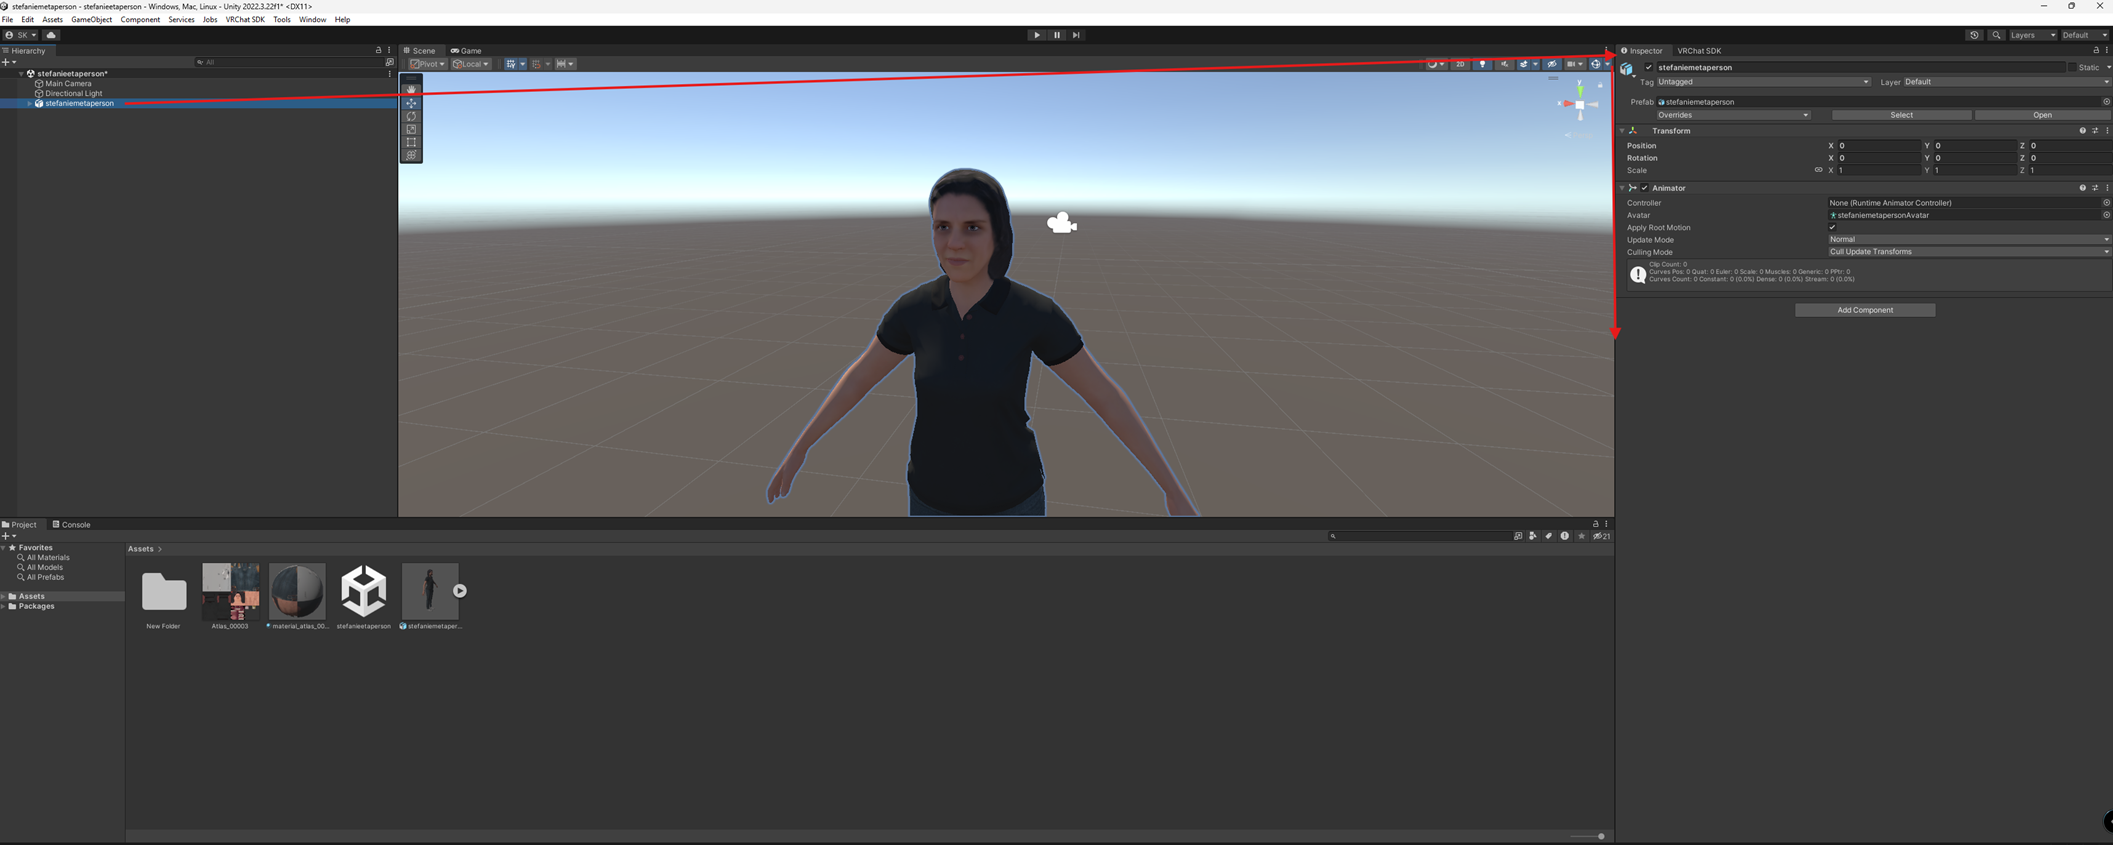
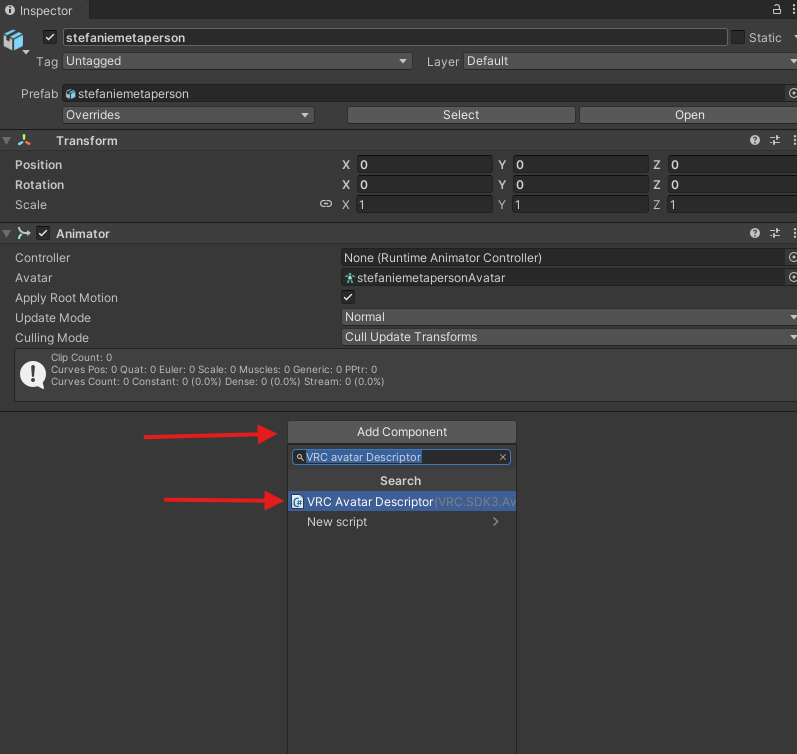
- In the Inspector, click Add Component
- Search for VRC Avatar Descriptor
- Add
it - this tells VRChat: "this is an avatar!"
??? Step 3 -Set the Viewpoint
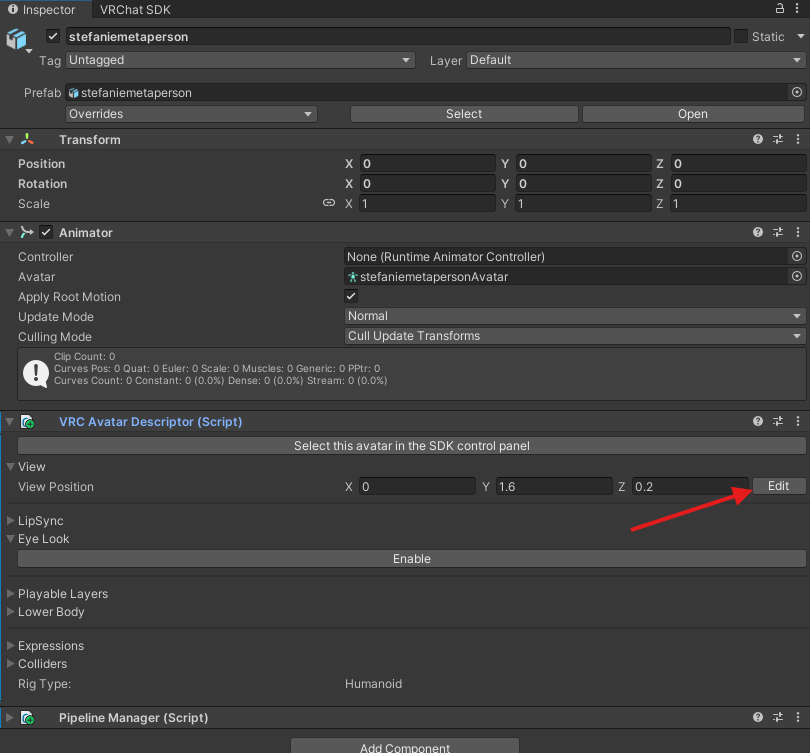
- In the Avatar Descriptor, click Edit next to "Viewpoint"
- A
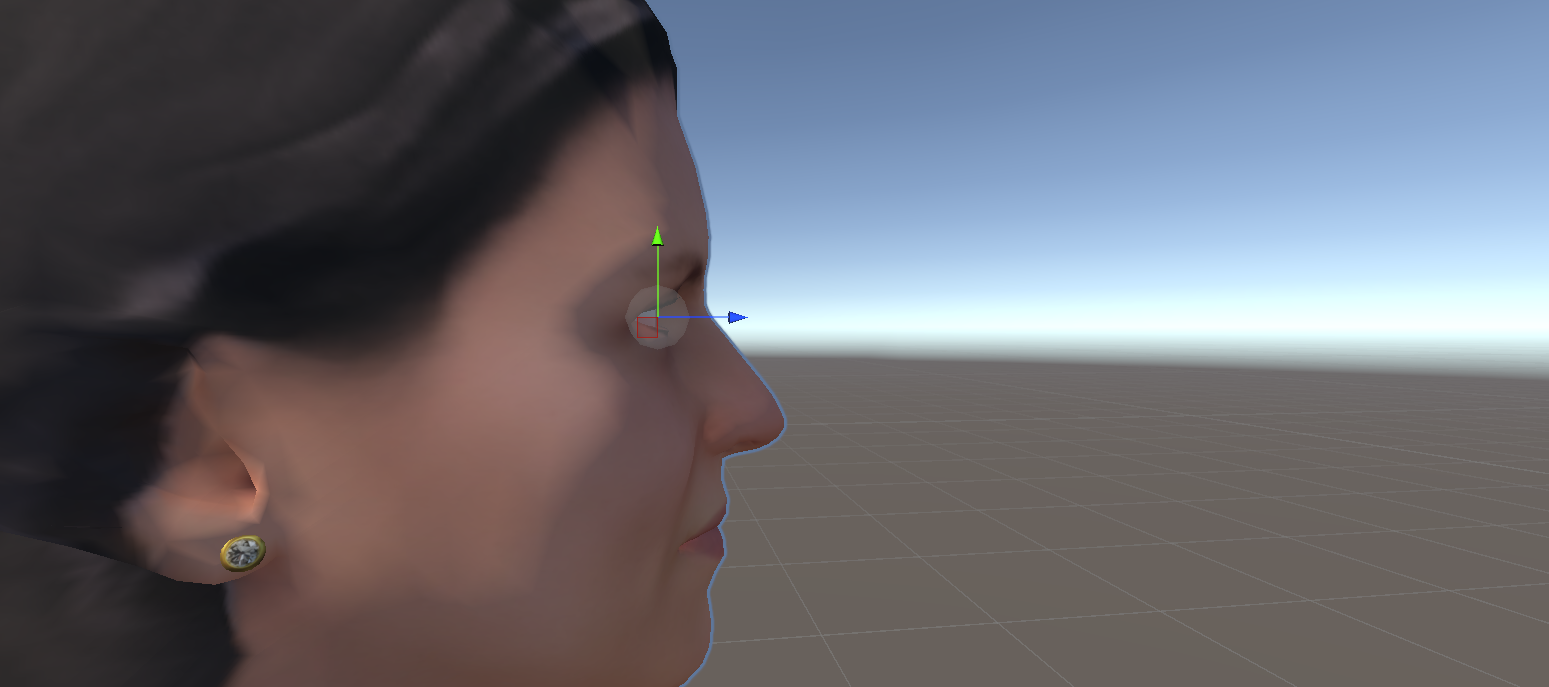
small blue sphere appears in front of your avatar’s face
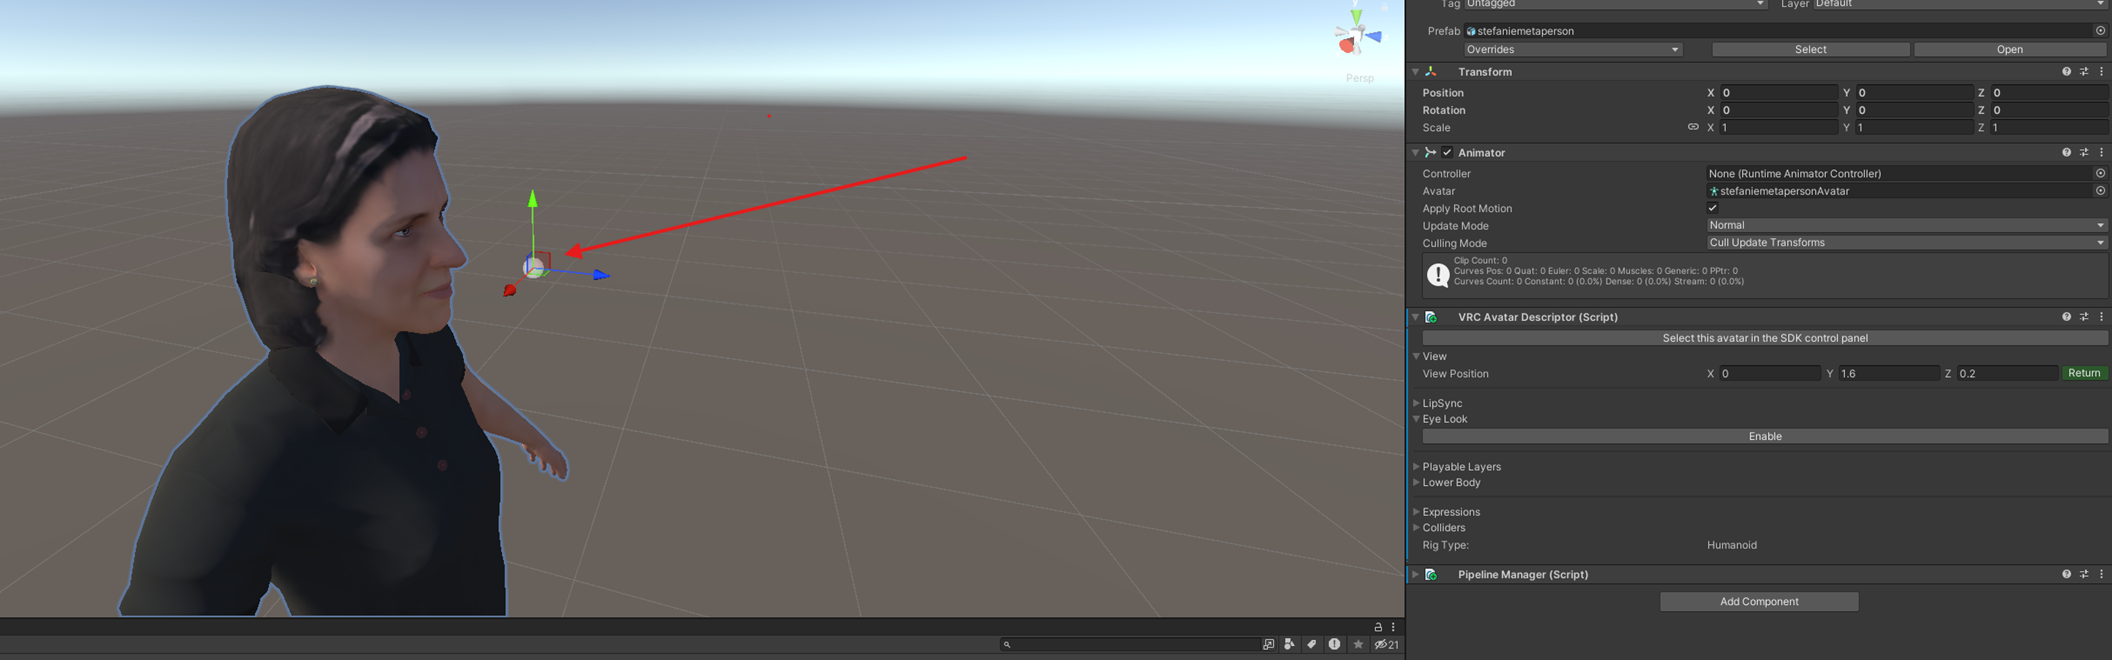
??
Place it exactly between the eyes - this is where your "VR
eyes" will be in-game
If it’s too high: you’ll feel too tall.
If it’s too low or behind: you’ll feel disconnected from the avatar.
Drag it carefully until it feels natural!
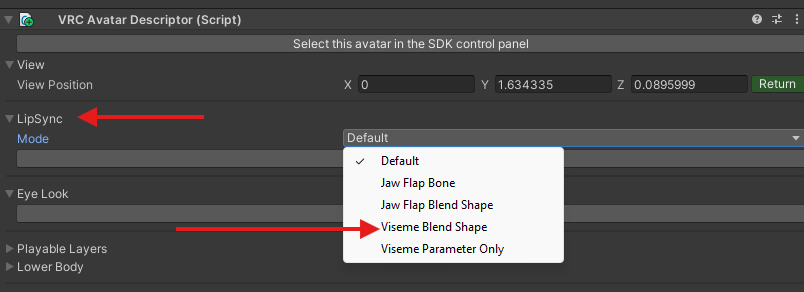
??? Step 4 -Set Up Lipsync (Viseme Blendshapes)
- In the Avatar Descriptor, scroll down to Lip Sync
- Choose
Viseme Blend Shape
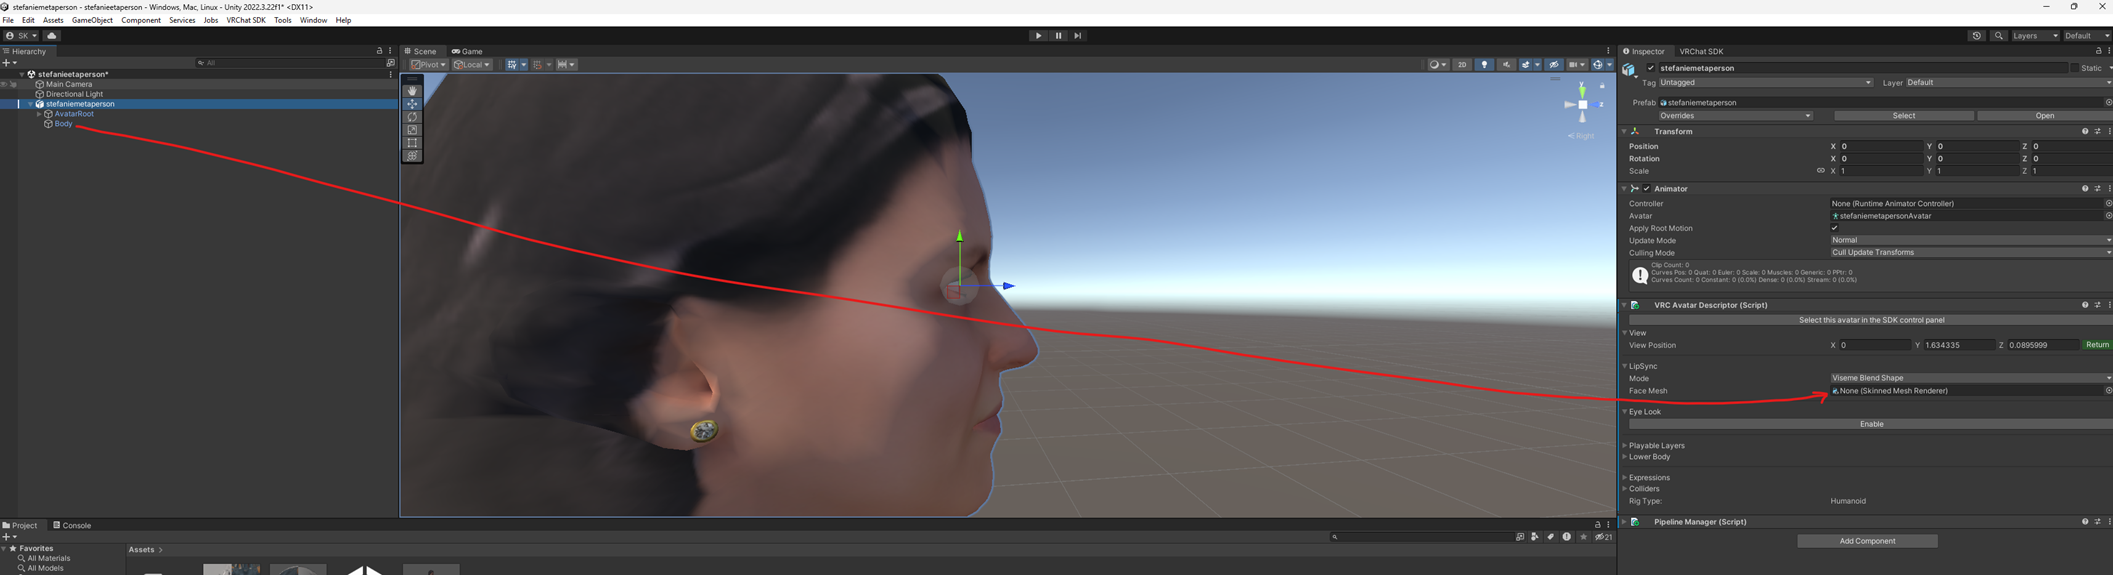
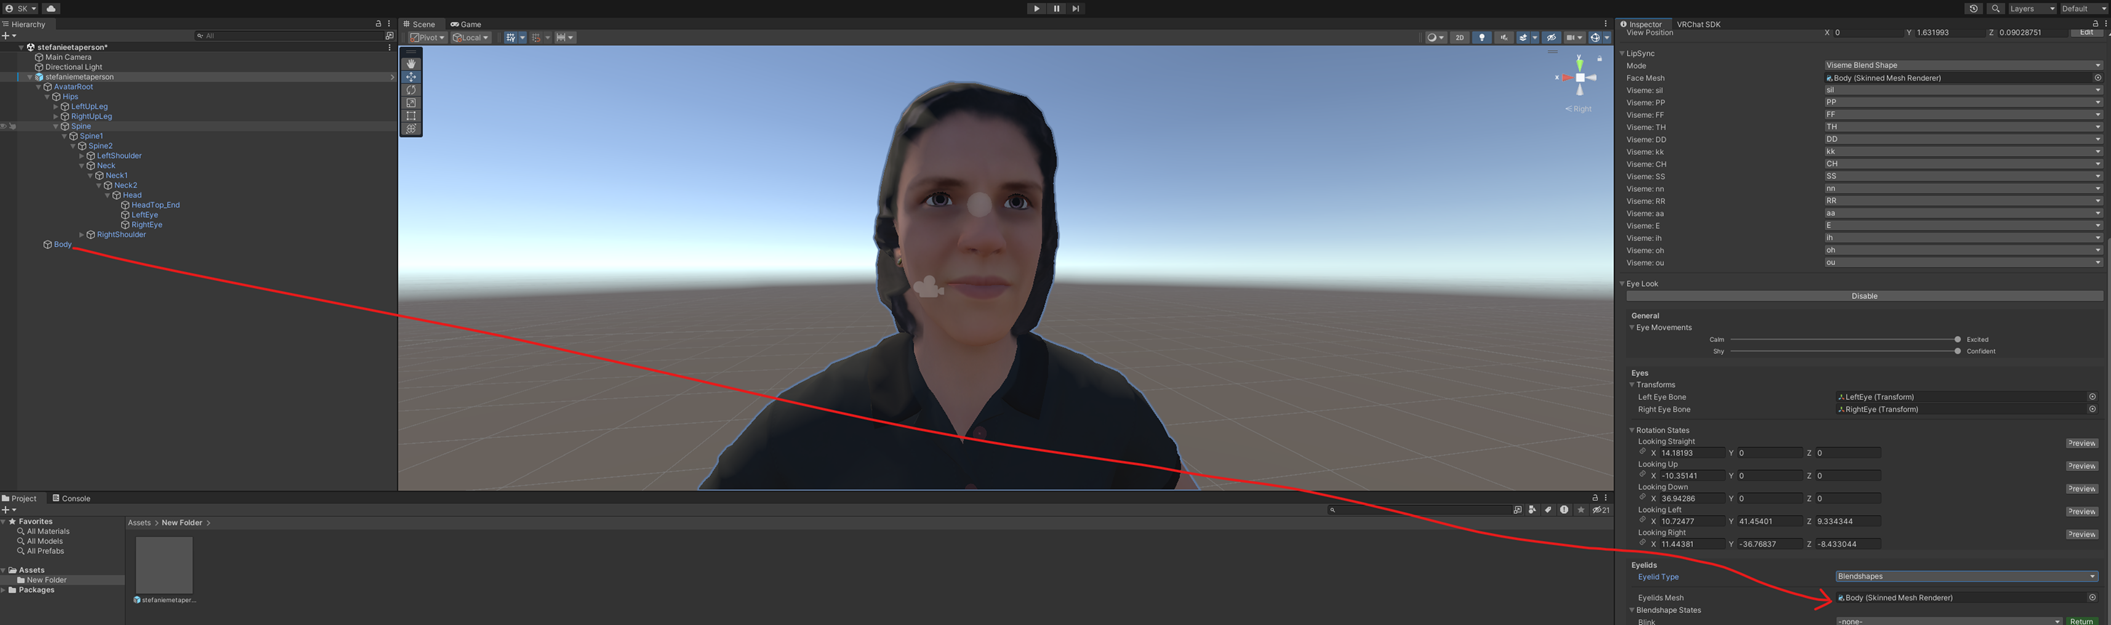
- Drag
your Body mesh from the Hierarchy into the Face Mesh slot
- Check
if all viseme names (like vrc.v_aa, vrc.v_oh) match the names from Blender
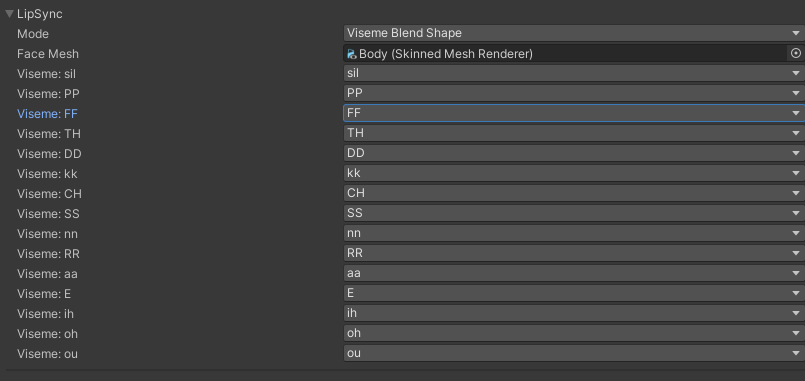
- ?
If the names don’t match:
? Go back to Blender and rename the shapekeys
? Or use a tool like CATS to convert them automatically
?? You can preview visemes in Unity by using the Debug Viseme preview!
?? Step 5 -Set Up Eye Look (Eye Tracking)
- Scroll
to Eye Look and enable it

• Below that, you’ll see two sliders under Eye Movements:
-Calm ? Excited
-Shy ? Confident
These sliders control how expressive your avatar’s eyes
behave in-game.

?? Feel free to adjust
them to suit your avatar’s style or personality:
- A
setting closer to Calm and Shy gives your avatar more
subtle, gentle eye movements
- A
setting closer to Excited and Confident will make the eyes
more lively and animated
?? There’s no perfect
value - just drag the sliders until it feels right for your character!
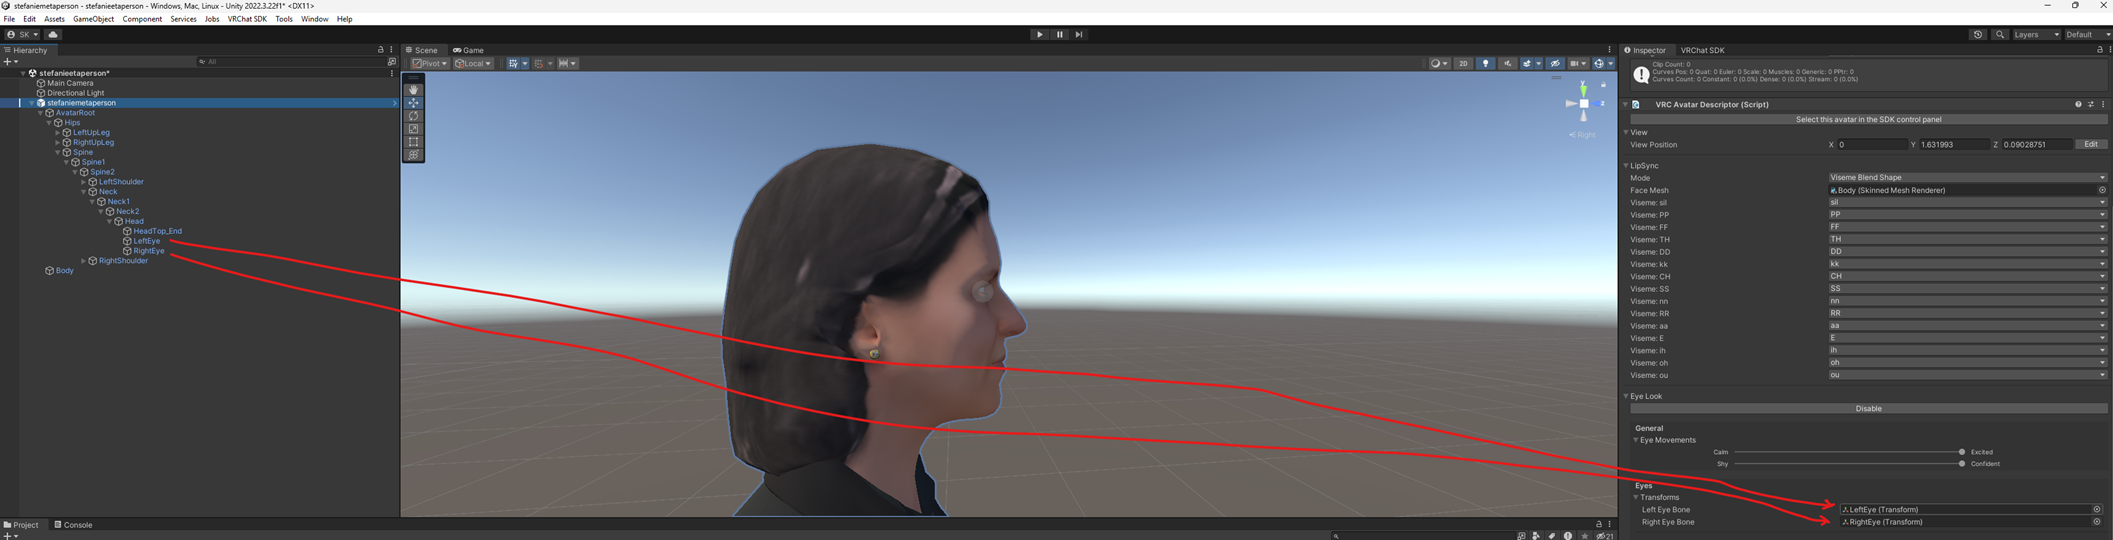
• In the Hierarchy, find the LeftEye and RightEye bones
• Drag them into the Left Eye and Right Eye slots in the Avatar
Descriptor
• In the Hierarchy, find the LeftEye and RightEye bones
• Drag them into the Left Eye and Right Eye slots in the Avatar
Descriptor
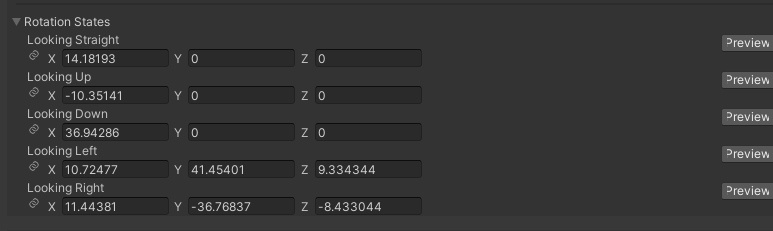
Use the following settings for realistic movement:
?? Step 6 -Set Up Eyelids
with Blink Blendshape
?? [Screenshot: Eyelids section]
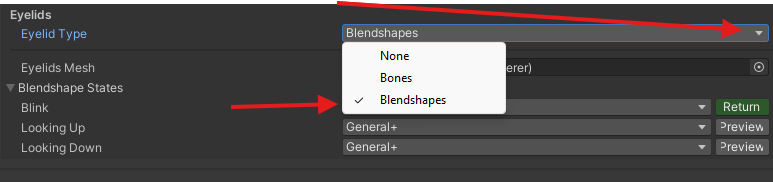
- Scroll to the Eyelids section
- Set
Type to Blendshapes
- Drag
your avatar’s body mesh into the Skinned Mesh Renderer field
Now select Blink under the dropdown -
But... if it’s missing, you need to create one!
?? Step 7 -Create a Blink Blendshape in Blender
- Open Blender
- Go to the green triangle tab (Object Data Properties)
- Set
eyeBlinkLeft and eyeBlinkRight to 1.0
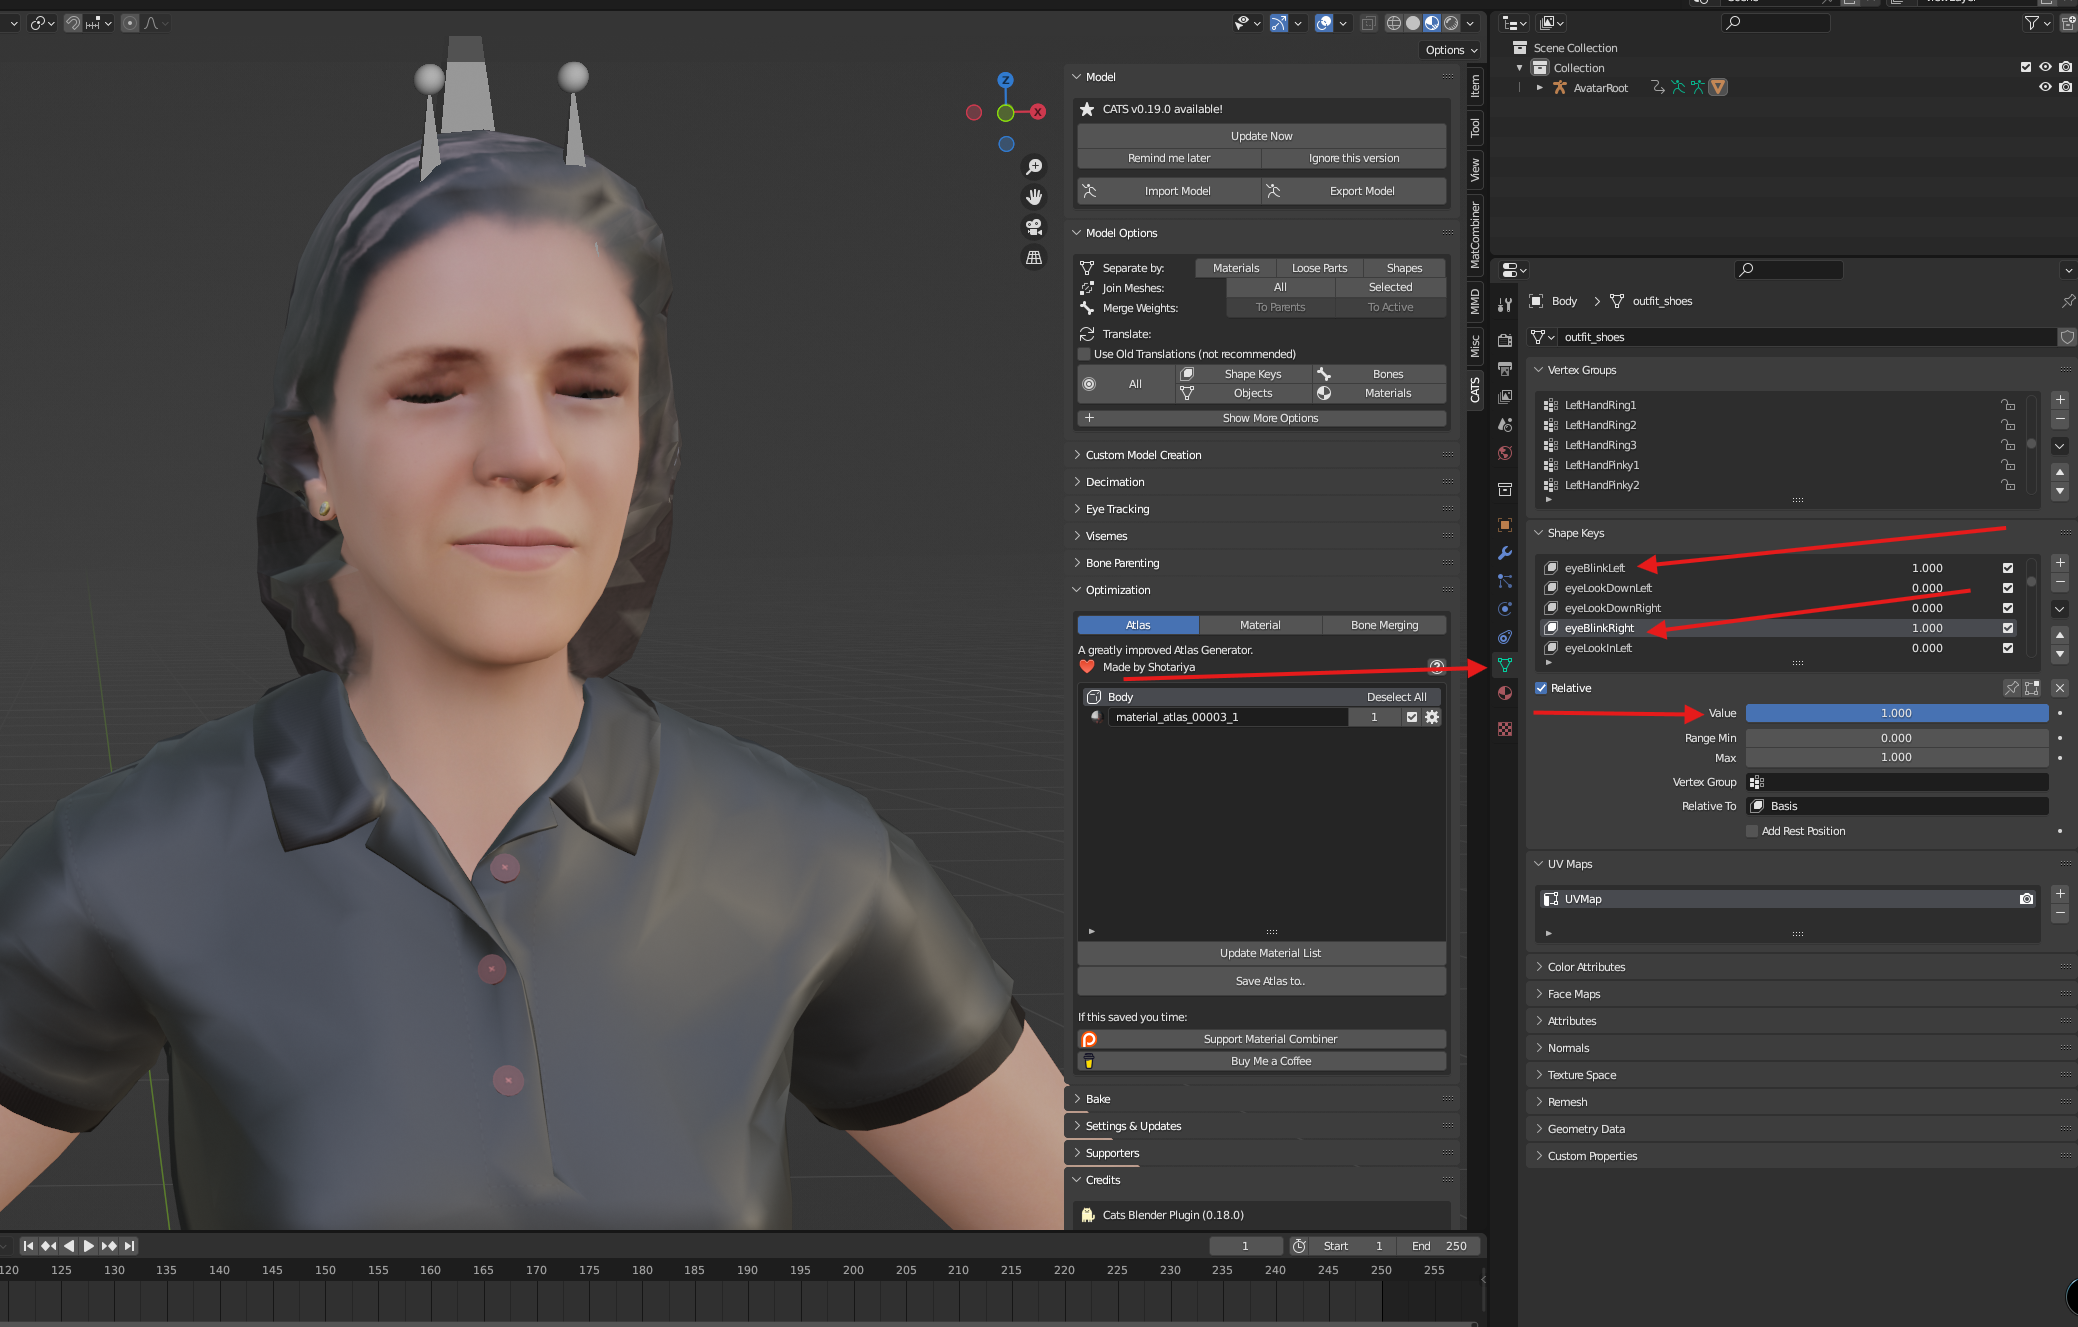
- Now the eyes are closed
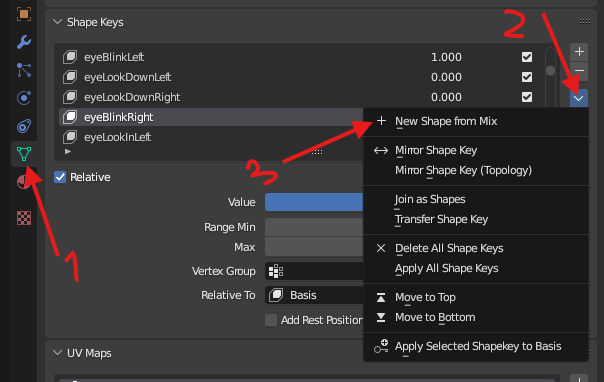
- Click the dropdown and choose New Shape from Mix
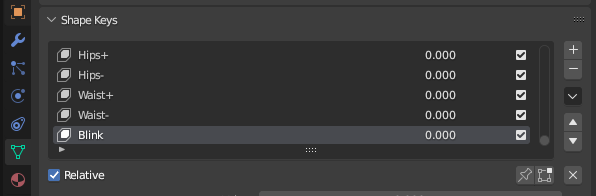
Rename the new shape key to Blink
- Set eyeBlinkLeft and eyeBlinkRight back to 0
- Export
the FBX again (same name in unity assetsfolder), Remember to uncheck
Add Leaf Bones
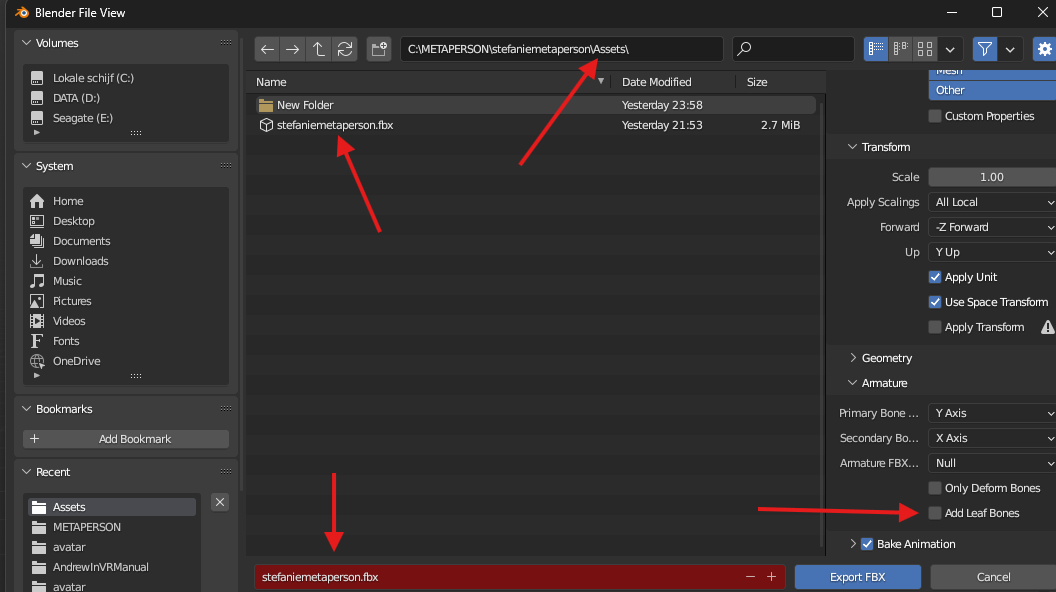
- Unity will update the avatar automatically
- Now
back in Unity, Blink is available - select it

? Done! Your avatar now has full eye tracking and blinking!
? You’re Ready!
Your avatar now:
- Is placed correctly
- Has a realistic VR viewpoint
- Can blink using blendshapes
- Reacts to eye movement
- Syncs lips with voice using visemes
Next up: GoGoLoco and final upload! ??